插件
更新: 10/11/2025 字数: 0 字 时长: 0 分钟
时间线
采用了 @HanochMa/vitepress-markdown-timeline 的项目
Demo:https://hanochma.github.io/daily/2023-04
pnpm add -D vitepress-markdown-timelineyarn add -D vitepress-markdown-timelinenpm install vitepress-markdown-timelinebun add -D vitepress-markdown-timeline在 config.mts 中注册 markdown 解析插件
import timeline from "vitepress-markdown-timeline";

export default {
  markdown: {
    //行号显示
    lineNumbers: true,

    //时间线
    config: (md) => {
      md.use(timeline);
    },
  },
}在 .vitepress/theme/index.ts 中引入时间线样式
说明
如果你没有这个文件,就自己新建
// .vitepress/theme/index.ts
import DefaultTheme from 'vitepress/theme'

// 只需添加以下一行代码,引入时间线样式
import "vitepress-markdown-timeline/dist/theme/index.css";

export default {
  extends: DefaultTheme,
}最后我们在markdown文件中,按格式使用即可
输入:
::: timeline 2023-04-24
- 一个非常棒的开源项目 H5-Dooring 目前 star 3.1k
  - 开源地址 https://github.com/MrXujiang/h5-Dooring
  - 基本介绍 http://h5.dooring.cn/doc/zh/guide/
- 《深入浅出webpack》 http://webpack.wuhaolin.cn/
:::

::: timeline 2023-04-23
:::谷歌分析
利用插件 google-analytics ,来查看网站访问量
这里我们用 @ZhongxuYang/vitepress-plugin-google-analytics 的插件
pnpm add -D vitepress-plugin-google-analyticsyarn add -D vitepress-plugin-google-analyticsnpm install vitepress-plugin-google-analyticsbun add -D vitepress-plugin-google-analytics在 .vitepress/theme/index.ts 中引入
// .vitepress/theme/index.ts
import DefaultTheme from "vitepress/theme"
import googleAnalytics from 'vitepress-plugin-google-analytics'

export default {
  extends: DefaultTheme,
  enhanceApp({app}) {
    googleAnalytics({
      id: 'G-******', //跟踪ID,在analytics.google.com注册即可
    }),
  },
}图片缩放
Vuepress是可以直接安装插件 medium-zoom 的,非常好用
但是Vitepress直接用不了,在 vitepress的issues中找到了方法#854
pnpm add -D medium-zoomyarn add -D medium-zoomnpm install medium-zoombun add -D medium-zoom在 .vitepress/theme/index.ts 添加如下代码,并保存
// .vitepress/theme/index.ts
import DefaultTheme from 'vitepress/theme'

import mediumZoom from 'medium-zoom';
import { onMounted, watch, nextTick } from 'vue';
import { useRoute } from 'vitepress';

export default {
  extends: DefaultTheme,

  setup() {
    const route = useRoute();
    const initZoom = () => {
      // mediumZoom('[data-zoomable]', { background: 'var(--vp-c-bg)' }); // 默认
      mediumZoom('.main img', { background: 'var(--vp-c-bg)' }); // 不显式添加{data-zoomable}的情况下为所有图像启用此功能
    };
    onMounted(() => {
      initZoom();
    });
    watch(
      () => route.path,
      () => nextTick(() => initZoom())
    );
  },

}点击图片后,还是能看到导航栏,加一个遮挡样式
在 .vitepress/theme/style/var.css 中加入如下代码,并保存
/* .vitepress/theme/style/var.css */

.medium-zoom-overlay {
  z-index: 30;
}

.medium-zoom-image {
  z-index: 9999 !important;/* 给的值是21,但是实测盖不住,直接999 */
}测试一下效果,还不错
但是
有个小bug,每次修改完需要刷新才能起效,不过不影响使用

浏览量
基本上使用的是 不蒜子,免费的且足够好用
pnpm add -D busuanzi.pure.jsyarn add -D busuanzi.pure.jsnpm install busuanzi.pure.jsbun add -D busuanzi.pure.js// .vitepress/theme/index.ts
import DefaultTheme from 'vitepress/theme'
import { inBrowser } from 'vitepress'
import busuanzi from 'busuanzi.pure.js'
export default {
extends: DefaultTheme,
enhanceApp({ app , router }) {
if (inBrowser) {
router.onAfterRouteChanged = () => {
busuanzi.fetch()
}
}
},
}使用就很简单了,复制到页面中使用即可
说明
本地开发出现数字即算成功,等你部署后会显示正确的数值
本站总访问量 <span id="busuanzi_value_site_pv" /> 次
本站访客数 <span id="busuanzi_value_site_uv" /> 人次但是这也不好看啊,那就根据自己需求选择封装吧
自动侧边栏
发现一款自动侧边栏,简单好用 @jooy2/vitepress-sidebar
安装文档:https://vitepress-sidebar.jooy2.com/guide/getting-started
pnpm add -D vitepress-sidebaryarn add -D vitepress-sidebarnpm i -D vitepress-sidebar在 configs.mts 中引入配置,可以根据 作者api文档 按需修改
// .vitepress/configs.mts
import { generateSidebar } from 'vitepress-sidebar';

const vitepressSidebarOptions = {
  /* Options... */
};

export default defineConfig({
  themeConfig: {
    sidebar: generateSidebar({
      /*
       * For detailed instructions, see the links below:
       * https://vitepress-sidebar.jooy2.com/guide/api
       */
      documentRootPath: '/docs', //文档根目录
      // scanStartPath: null,
      // resolvePath: null,
      // useTitleFromFileHeading: true,
      // useTitleFromFrontmatter: true,
      // frontmatterTitleFieldName: 'title',
      // useFolderTitleFromIndexFile: false, //是否使用层级首页文件名做分级标题
      // useFolderLinkFromIndexFile: false, //是否链接至层级首页文件
      // hyphenToSpace: true,
      // underscoreToSpace: true,
      // capitalizeFirst: false,
      // capitalizeEachWords: false,
      collapsed: false, //折叠组关闭
      collapseDepth: 2, //折叠组2级菜单
      // sortMenusByName: false,
      // sortMenusByFrontmatterOrder: false,
      // sortMenusByFrontmatterDate: false,
      // sortMenusOrderByDescending: false,
      // sortMenusOrderNumericallyFromTitle: false,
      // sortMenusOrderNumericallyFromLink: false,
      // frontmatterOrderDefaultValue: 0,
      // manualSortFileNameByPriority: ['first.md', 'second', 'third.md'], //手动排序,文件夹不用带后缀
      removePrefixAfterOrdering: false, //删除前缀,必须与prefixSeparator一起使用
      prefixSeparator: '.', //删除前缀的符号
      // excludeFiles: ['first.md', 'secret.md'],
      // excludeFilesByFrontmatterFieldName: 'exclude',
      // excludeFolders: ['secret-folder'],
      // includeDotFiles: false,
      // includeRootIndexFile: false,
      // includeFolderIndexFile: false, //是否包含层级主页
      // includeEmptyFolder: false,
      // rootGroupText: 'Contents',
      // rootGroupLink: 'https://github.com/jooy2',
      // rootGroupCollapsed: false,
      // convertSameNameSubFileToGroupIndexPage: false,
      // folderLinkNotIncludesFileName: false,
      // keepMarkdownSyntaxFromTitle: false,
      // debugPrint: false,
    }),
  },
})为了避免安装插件影响教程,就写一个简单的示例
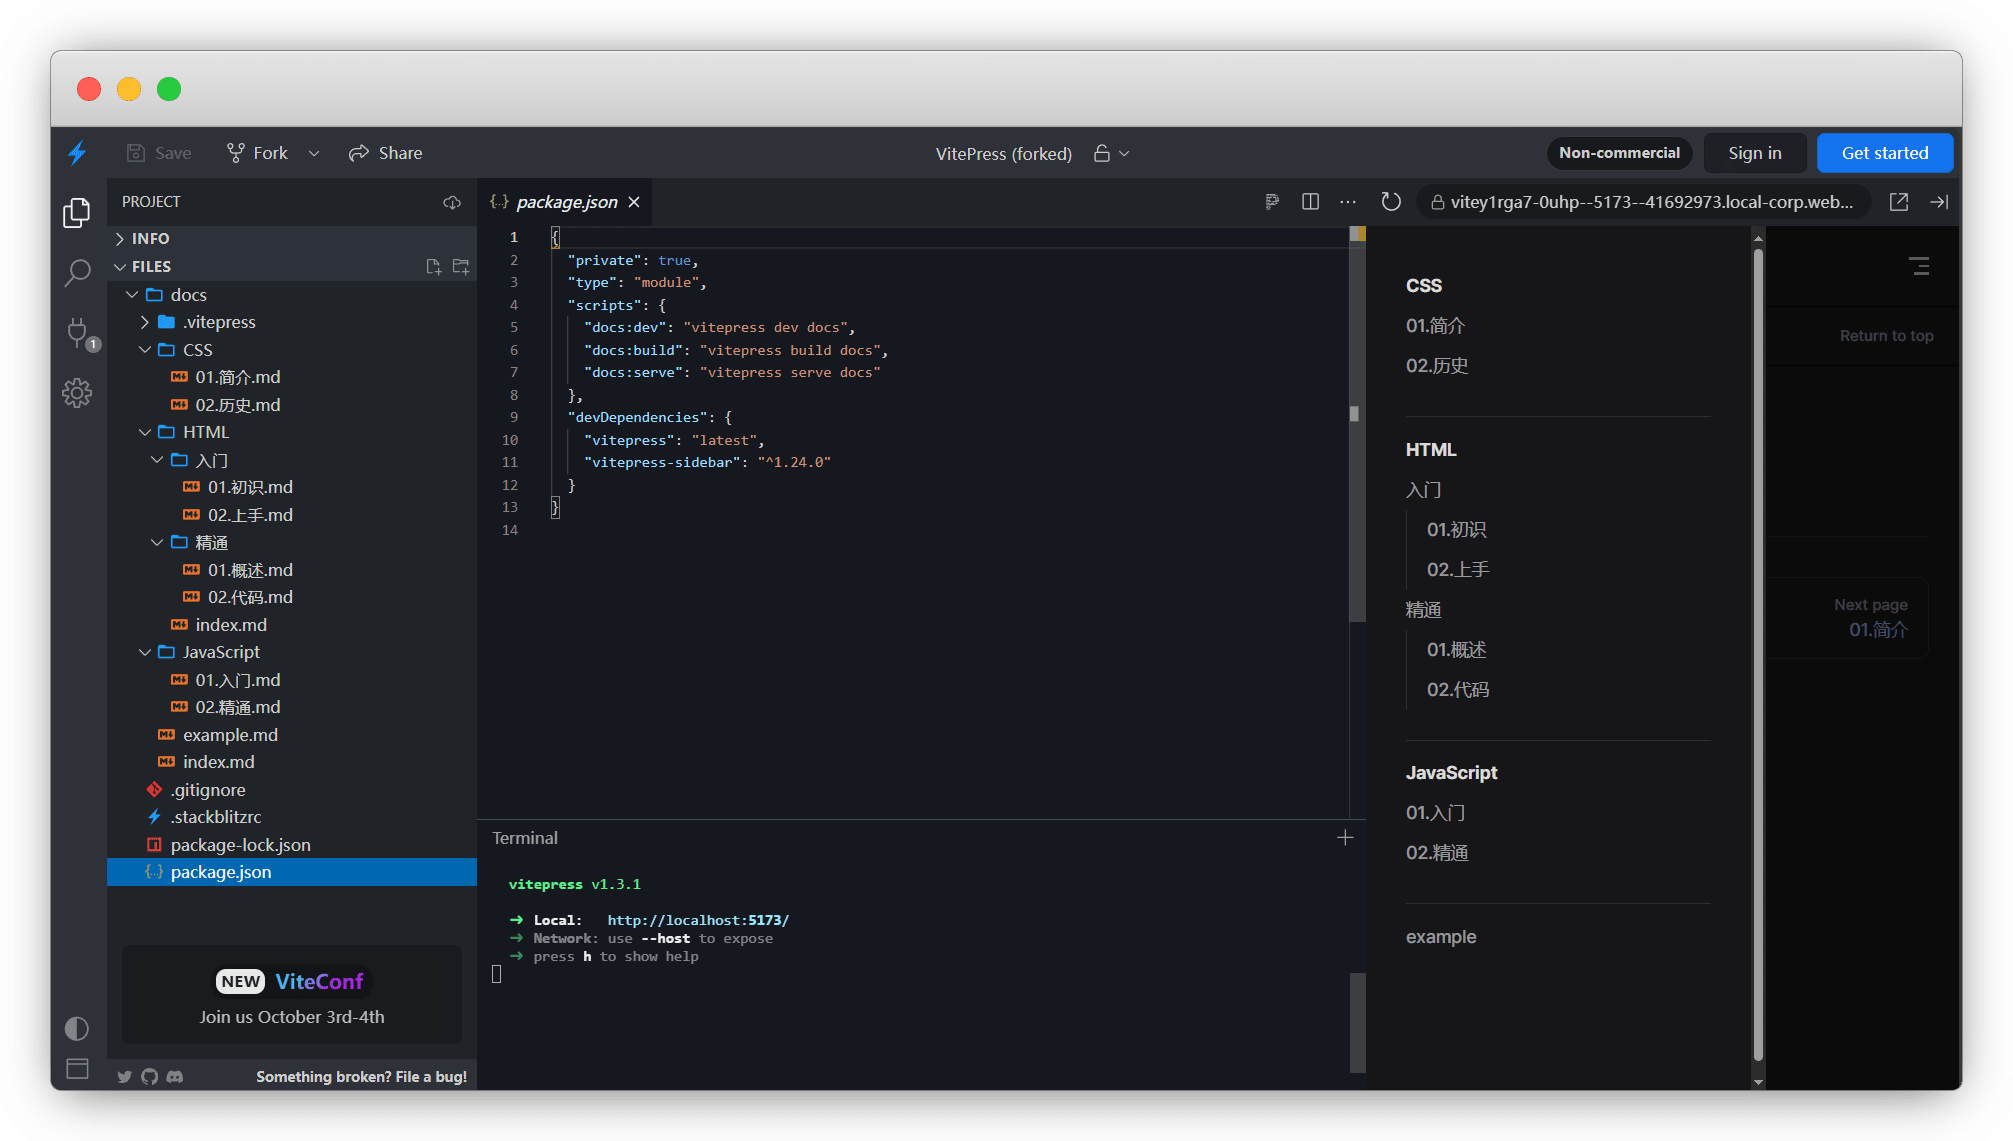
stackblitz演示:https://stackblitz.com/edit/vite-y1rga7
等待生成后可查看,左侧是目录,右侧是页面
注意:插件在读取目录之后,你再修改文件名,需要重启才能生效
Todo
为什么Vitepress没有任务列表,在 issues#1923 和 issues#413 里找到了这个问题
开发者认为
Vitepress并不需要这个,也可以通过 markdown-it 实现,但 vitepress集成的markdown-it 并没有此功能
看到推荐的 markdown-it-task-lists 年久失修,找了一下可以使用 markdown-it-task-checkbox 实现
我们需要用到另一款插件:markdown-it-task-checkbox
pnpm add -D markdown-it-task-checkboxyarn add -D markdown-it-task-checkboxnpm install markdown-it-task-checkbox --savebun add -D markdown-it-task-checkbox以下配置方式由 Aurorxa 提供
// .vitepress/config.mts
import markdownItTaskCheckbox from 'markdown-it-task-checkbox'

export default defineConfig({
  markdown: {
    config: (md) => {
      md.use(markdownItTaskCheckbox) //todo
    }
  },
})关于引用报错但未爆红
无法找到模块“markdown-it-task-checkbox”的声明文件。“/node_modules/.pnpm/markdown-it-task-checkbox@1.0.6/node_modules/markdown-it-task-checkbox/index.js”隐式拥有 "any" 类型。
尝试使用
npm i --save-dev @types/markdown-it-task-checkbox(如果存在),或者添加一个包含declare module 'markdown-it-task-checkbox';的新声明(.d.ts)文件ts(7016)
解决:
在 congfig.mts同级目录新建一个 type.d.ts 文件
粘贴 declare module 'markdown-it-task-checkbox'; 代码保存
输入:
- [ ] 吃饭
- [ ] 睡觉
- [x] 打豆豆输出:
觉得不好看,可以使用 Aurorxa 提供的样式
/* checkbox 颜色设置 */
li.task-list-item {
  display: flex;
  align-items: baseline;
  flex-wrap: wrap;
  /* margin: 2px 0 0; */
  list-style: inherit;
}

/* Target the last child element to push it to the next line */
li.task-list-item ul:last-child {
  flex-basis: 100%;
  margin-right: 0;
}

li.task-list-item input[type="checkbox"] {
  position: relative;
  width: 13px;
  height: 13px;
  line-height: 12px;
  margin-right: 8px;
  border: 1px solid #949494;

  -webkit-appearance: none;
  appearance: none;
  -moz-appearance: none;
}

li.task-list-item input[type="checkbox"]:after {
  position: absolute;
  top: 0;
  color: #000;
  width: 13px;
  height: 13px;
  display: inline-block;
  visibility: visible;
  padding-left: 0;
  text-align: center;
  content: " ";
  border-radius: 3px;
}

li.task-list-item input[type="checkbox"]:checked {
  background-color: var(--vp-c-brand);
}

li.task-list-item input[type="checkbox"]:checked::after {
  content: "✓";
  color: #fff;
  line-height: 13px;
  font-size: 10px;
  font-weight: 700;
  text-align: center;
}

.timeline-dot {
  color: #7f8c8d;
}

.task-list {
  margin: 0 !important;
}

li.task-list-item p {
  display: flex;
  margin: 0;
  align-items: center;
}然后在 index.css 中引入生效
/* .vitepress/theme/style/index.css */
@import './task-list.css';当然你也可以直接直接使用 emoji表情 ,懒人方式
✅ 吃饭
⬜ 睡觉
代码组图标
使用的是 @yuyinws/vitepress-plugin-group-icons
参照教程安装:https://vpgi.vercel.app/
pnpm add -D vitepress-plugin-group-iconsyarn add -D vitepress-plugin-group-iconsnpm install vitepress-plugin-group-iconsbun add -D vitepress-plugin-group-icons然后在 config.mts 中配置
groupIconMdPlugin 报错?
请备份配置及文件后,重新安装VitePress
// .vitepress/config.mts
import { defineConfig } from 'vitepress'
import { groupIconMdPlugin, groupIconVitePlugin } from 'vitepress-plugin-group-icons'

export default defineConfig({

  markdown: {
    config(md) {
      md.use(groupIconMdPlugin) //代码组图标
    },
  },

  vite: {
    plugins: [
      groupIconVitePlugin() //代码组图标
    ],
  },

})最后还需要再 index.ts 中引入样式
// .vitepress/theme/index.ts
import DefaultTheme from 'vitepress/theme'

import 'virtual:group-icons.css' //代码组样式

export default {
  extends: DefaultTheme,
}使用时,请确保代码后有对应的文字触发
::: code-group
```sh [pnpm]
pnpm -v
```

```sh [yarn]
yarn -v
```

```sh [bun]
bun -v
```
:::已经内置的常用图标有
export const builtInIcons: Record<string, string> = {
  // package manager
  pnpm: 'logos:pnpm',
  npm: 'logos:npm-icon',
  yarn: 'logos:yarn',
  bun: 'logos:bun',
  // framework
  vue: 'logos:vue',
  svelte: 'logos:svelte-icon',
  angular: 'logos:angular-icon',
  react: 'logos:react',
  next: 'logos:nextjs-icon',
  nuxt: 'logos:nuxt-icon',
  solid: 'logos:solidjs-icon',
  // bundler
  rollup: 'logos:rollupjs',
  webpack: 'logos:webpack',
  vite: 'logos:vitejs',
  esbuild: 'logos:esbuild',
}那么如何自定义呢,我们先在 iconify 中找到中意的图标
说明
本地图标格式:只能使用相对路径
远程图标格式:必须是
logos:***
图标名复制后,可以在 config.mts 中配置
// .vitepress/config.mts
import { defineConfig } from 'vitepress'
import { groupIconMdPlugin, groupIconVitePlugin, localIconLoader } from 'vitepress-plugin-group-icons'

export default defineConfig({

  markdown: {
    config(md) {
      md.use(groupIconMdPlugin) //代码组图标
    },
  },

  vite: {
    plugins: [
      groupIconVitePlugin({
        customIcon: {
          ts: localIconLoader(import.meta.url, '../public/svg/typescript.svg'), //本地ts图标导入
          js: 'logos:javascript', //js图标
          md: 'logos:markdown', //markdown图标
          css: 'logos:css-3', //css图标
        },
      })
    ],
  },

})来吧看看,效果如何
console.log("I'm TypeScript");console.log("I'm JavaScript");Markdown图标演示h1 {
background: red;
}禁用F12
使用的是 @cellinlab/vitepress-protect-plugin
pnpm add -D vitepress-protect-pluginyarn add -D vitepress-protect-pluginnpm install vitepress-protect-pluginbun add -D vitepress-protect-plugin然后在 config.mts 中配置,不用的功能不配置即可
import { defineConfig } from "vitepress"
import vitepressProtectPlugin from "vitepress-protect-plugin"

export default defineConfig({
  // other VitePress configs...
  vite: {
    plugins: [
      vitepressProtectPlugin({
        disableF12: true, // 禁用F12开发者模式
        disableCopy: true, // 禁用文本复制
        disableSelect: true, // 禁用文本选择
      }),
    ],
  },
})切换路由进度条
当你切换页面,顶部会显示进度条,使用的是 @Skyleen77/nprogress-v2
先安装 nprogress-v2
pnpm add -D nprogress-v2yarn add -D nprogress-v2npm install nprogress-v2bun add -D nprogress-v2然后再 index.ts 中配置,即可生效
// .vitepress/theme/index.ts

import { NProgress } from 'nprogress-v2/dist/index.js' // 进度条组件
import 'nprogress-v2/dist/index.css' // 进度条样式

if (inBrowser) {
      NProgress.configure({ showSpinner: false })
      router.onBeforeRouteChange = () => {
        NProgress.start() // 开始进度条
      }
      router.onAfterRouteChanged = () => {
         busuanzi.fetch()
         NProgress.done() // 停止进度条
      }
}Mermaid
根据 VitePress Plugin Mermaid插件官网 的教程安装依赖
pnpm add -D vitepress-plugin-mermaidyarn add -D vitepress-plugin-mermaidnpm i -D vitepress-plugin-mermaidbun add -D vitepress-plugin-mermaid在 config.mts 中进行配置
import { withMermaid } from 'vitepress-plugin-mermaid'
export default defineConfig({
如果报错了页面打不开,你还需要安装如下几个依赖
pnpm add -D @braintree/sanitize-url cytoscape cytoscape-cose-bilkent dayjs debugyarn add -D @braintree/sanitize-url cytoscape cytoscape-cose-bilkent dayjs debugnpm i -D @braintree/sanitize-url cytoscape cytoscape-cose-bilkent dayjs debugbun add -D @braintree/sanitize-url cytoscape cytoscape-cose-bilkent dayjs debug不想安装这么多依赖?你可以这样配置
仅安装mermaid
pnpm add -D mermaidyarn add -D mermaidnpm i -D mermaidbun add -D mermaidimport { MermaidMarkdown, MermaidPlugin } from 'vitepress-plugin-mermaid';
export default defineConfig({
markdown: {
config(md) {
md.use(MermaidMarkdown);
},
},
vite: {
plugins: [MermaidPlugin()],
optimizeDeps: {
include: ['mermaid'],
},
ssr: {
noExternal: ['mermaid'],
},
},
});输入:
```mermaid
flowchart LR
  Start --> Stop
```输出:
输入:
```mermaid
graph LR
    A[Java 数据类型] --> B[原始数据类型]
    A[Java 数据类型] --> C[引用数据类型]

    B --> D[整数类型]
    B --> E[浮点类型]
    B --> F[字符类型]
    B --> G[布尔类型]

    D --> H[int]
    D --> I[long]
    D --> J[short]
    D --> K[byte]

    E --> L[float]
    E --> M[double]

    F --> N[char]

    G --> O[boolean]

    C --> P[类]
    C --> Q[接口]
C --> R[数组]输出:
更多使用方式,请查看 VitePress Plugin Mermaid官网
评论
从个人角度而言,Giscus 最佳,就用它演示,其他的这里就不赘述了
为什么使用 Giscus
| 评论系统 | 说明 |
|---|---|
| Valine | 不用登录账号即可评论,但容易产生垃圾评论,其次没有评论提醒通知 |
| Waline | 是Valine的升级版,登录后方可评论,有通知,但是需要自己部署服务端 |
| Twikoo | 不用登录账号即可评论,但容易产生垃圾评论,有通知,但是需要自己部署服务端 |
| Artalk | 可设置是否启用登录账号后评论,有通知,但是需要自己部署服务端 |
| utteranc | GitHub登录后方可评论,评论数据在 GitHub issues 中,评论后有邮件通知,无需部署服务端,但UI样式一般,且移动端不显示头像 |
| gitalk | GitHub登录后方可评论,评论数据在 GitHub issues 中,评论后有邮件通知,无需部署服务端,UI样式一般,评论不支持点赞 |
| ⭐Giscus | GitHub登录后方可评论,评论数据在 GitHub Discussions 中,评论后有邮件通知,无需部署服务端,UI爱了 |
关于 @xinlei3166 的 waline 插件
在使用看板娘发时候就已经装好了,直接引用就行了
// .vitepress/theme/index.ts
import DefaultTheme from 'vitepress/theme'

import { useWaline } from 'vitepress-theme-website'

export default {
  extends: DefaultTheme,

  setup() {

    useWaline({
      serverURL: 'https://you_url.com'
    }),

  }
}记得 serverURL 换成自己的即可,但是作者的插件有个bug,暗黑模式下看不清字
安装giscus
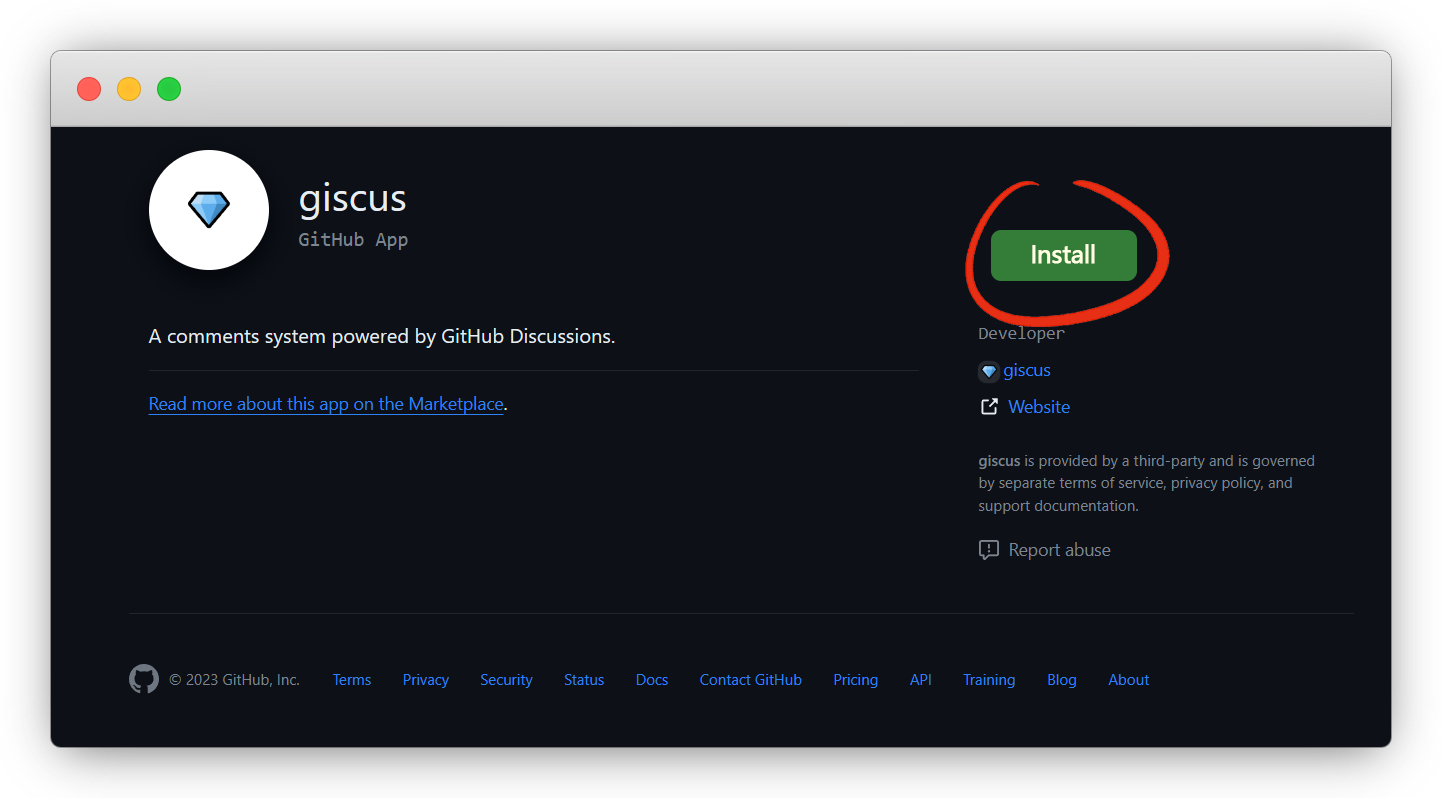
Giscus 是一个基于 GitHub Discussion 的评论系统,启用简便
进 Giscus App官网:https://github.com/apps/giscus
点击 Install 安装
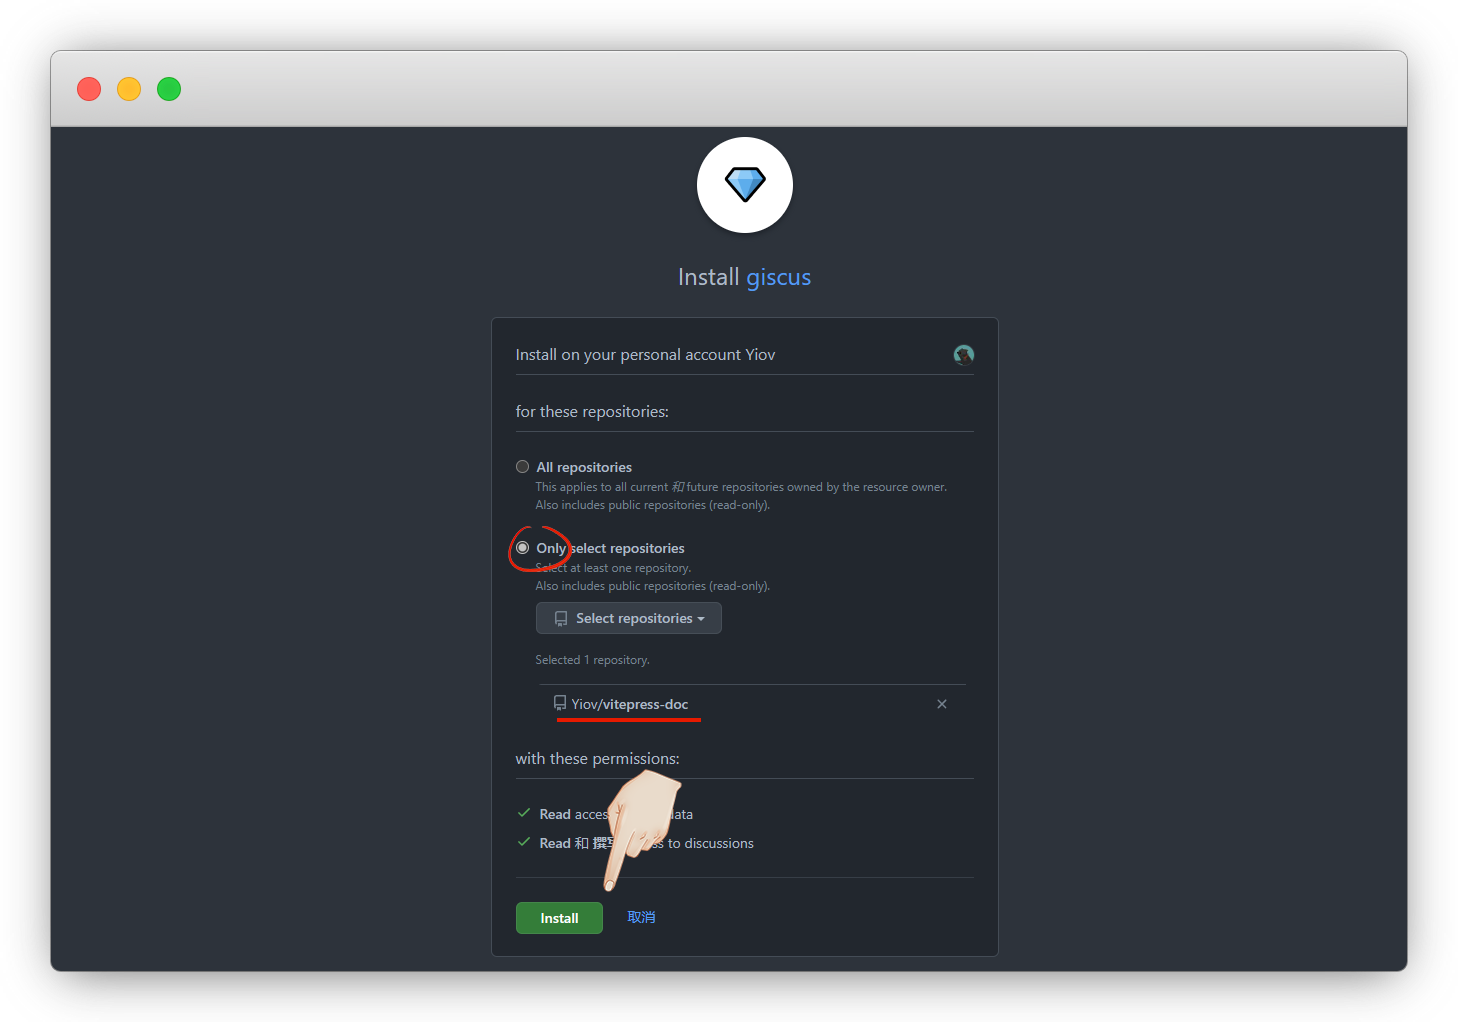
选择 Only select repositories,再指定一个你想开启讨论的仓库
注意
仓库必须是公开的,私有的不行
想单独放评论,新建一个也可
查看
完成后可以在个人头像-设置-应用 Applications 中看到
开启讨论
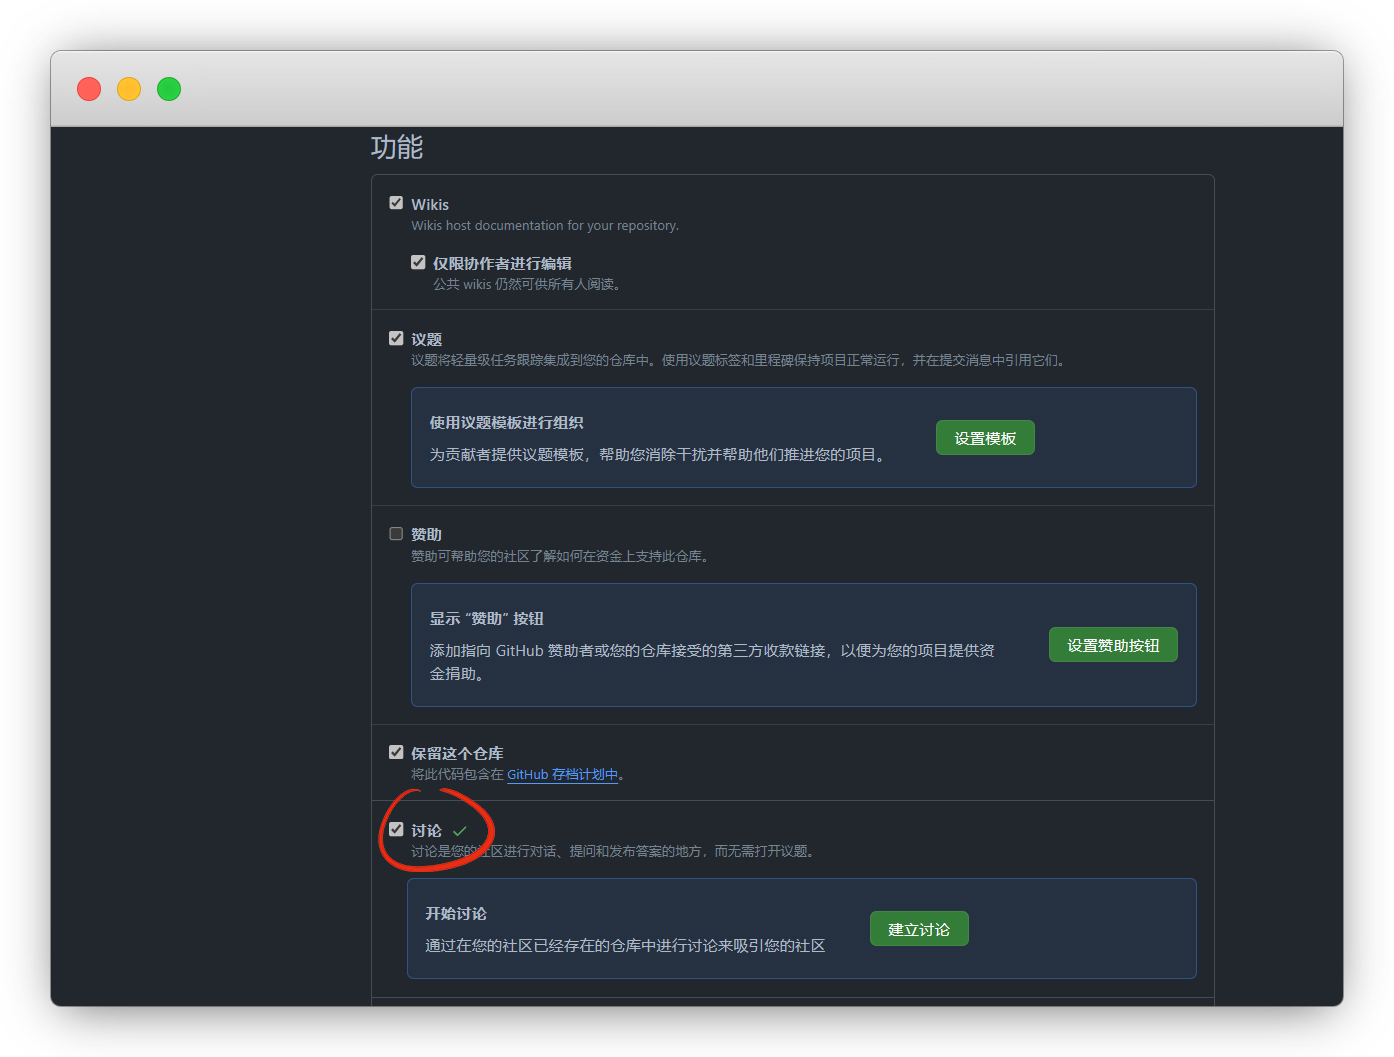
因为giscus会把评论数据都放到讨论 discussions 中
我们进入要开启讨论的仓库,点设置 - 勾选讨论 Settings - discussions
生成数据
输入自己的仓库链接,满足条件会提示可用
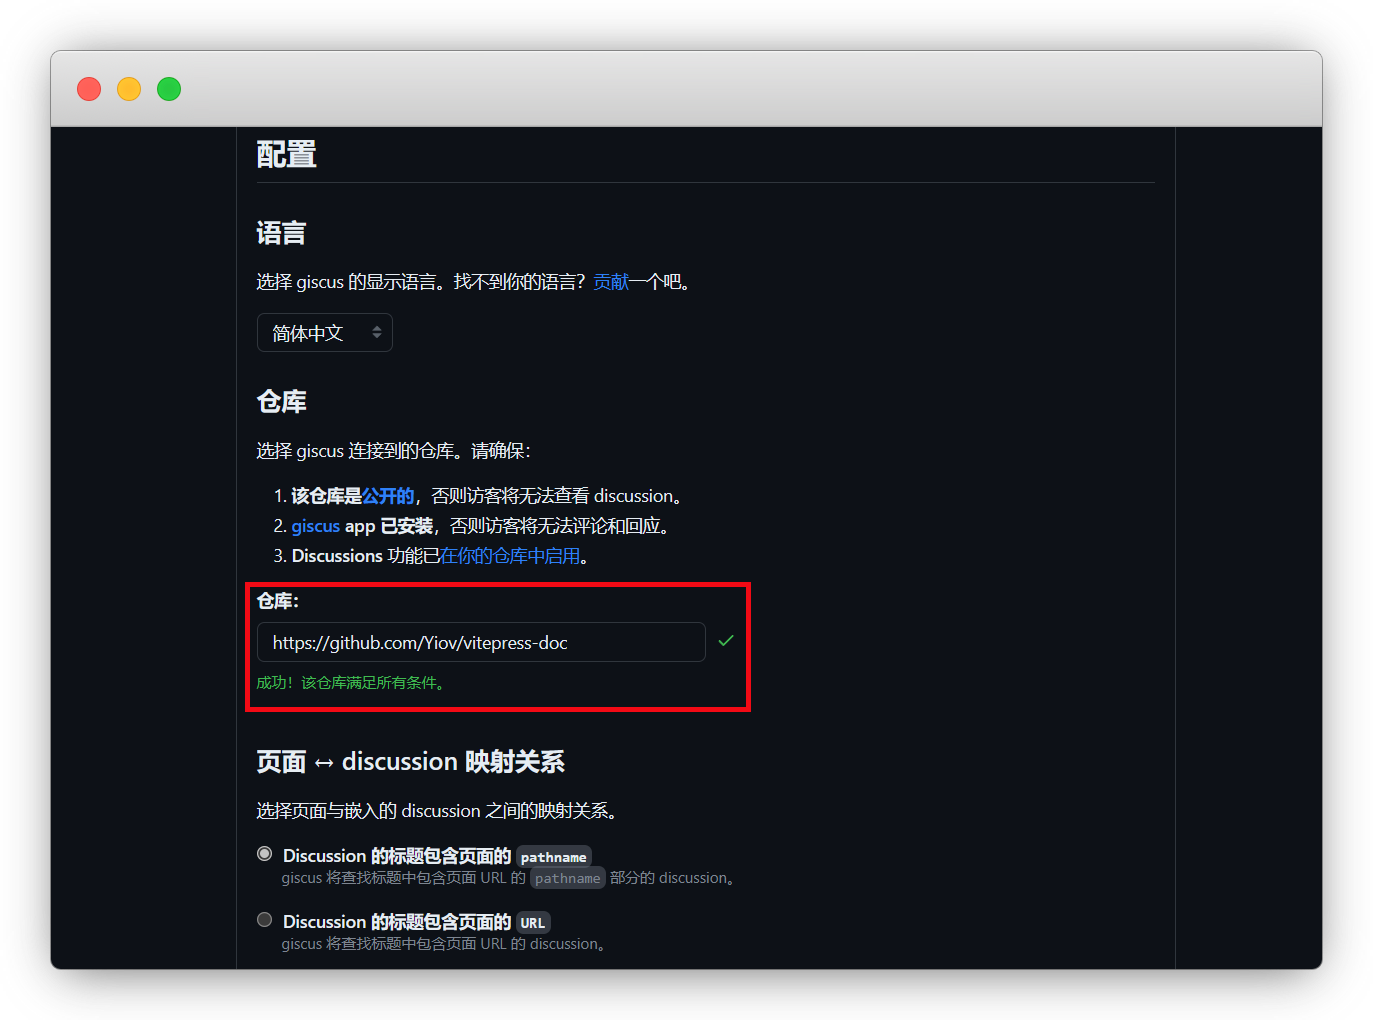
下拉到 Discussion 分类推荐选 General ,懒加载评论也可以勾选下
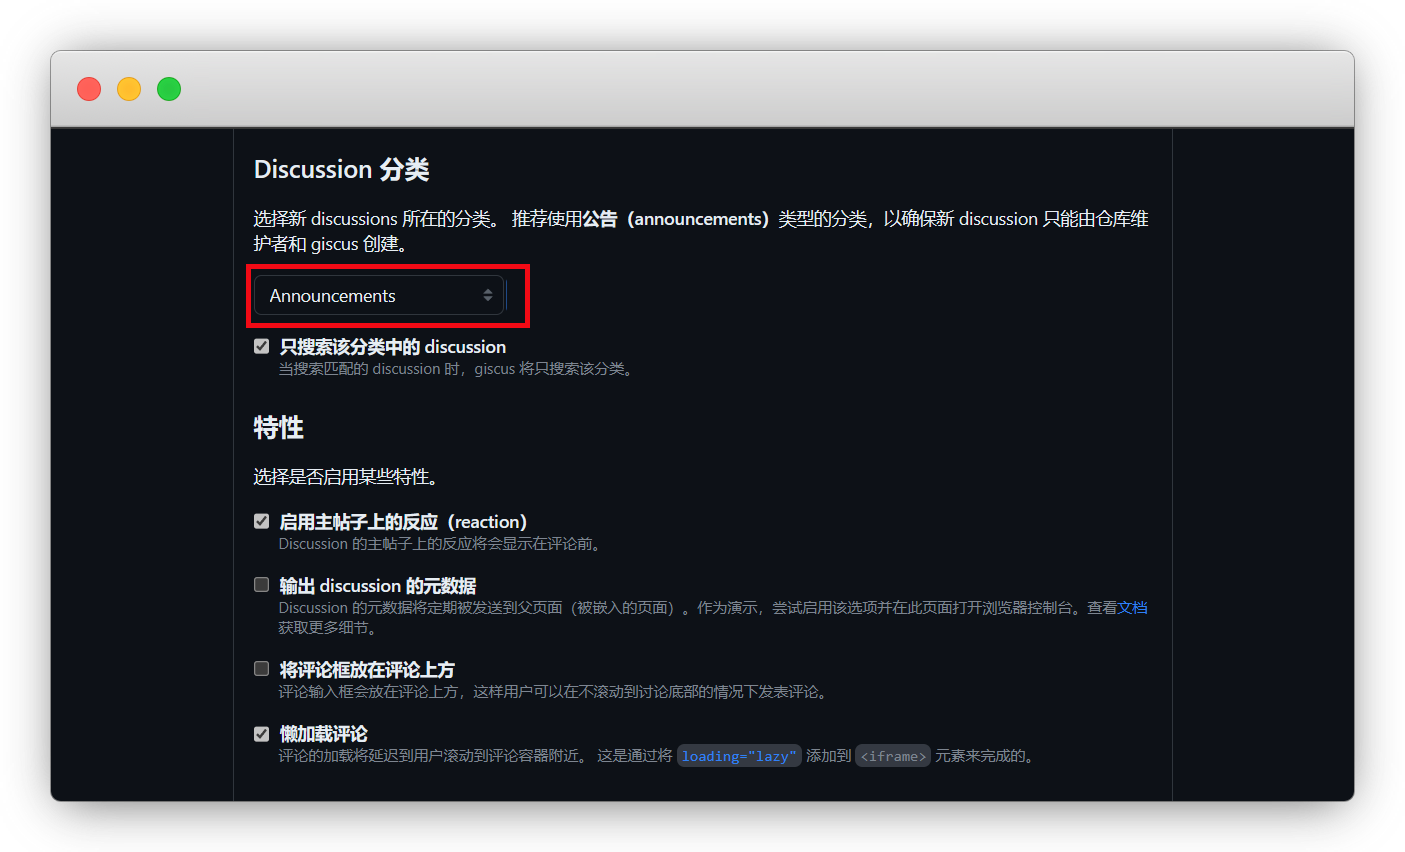
关于讨论的类型,分类如下
查看了一下 Github的讨论文档
| 类别 | 中文 | 说明 |
|---|---|---|
| Announcements | 公告 | 每次评论都会推送所有人 |
| General | 常规 | 开放式讨论 |
| Ideas | 想法 | 开放式讨论 |
| Polls | 投票 | 可投票与讨论 |
| Q&A | 问答 | 问答形式 |
| Show and tell | 展示和说明 | 开放式讨论 |
下方就自动生成了你的关键数据
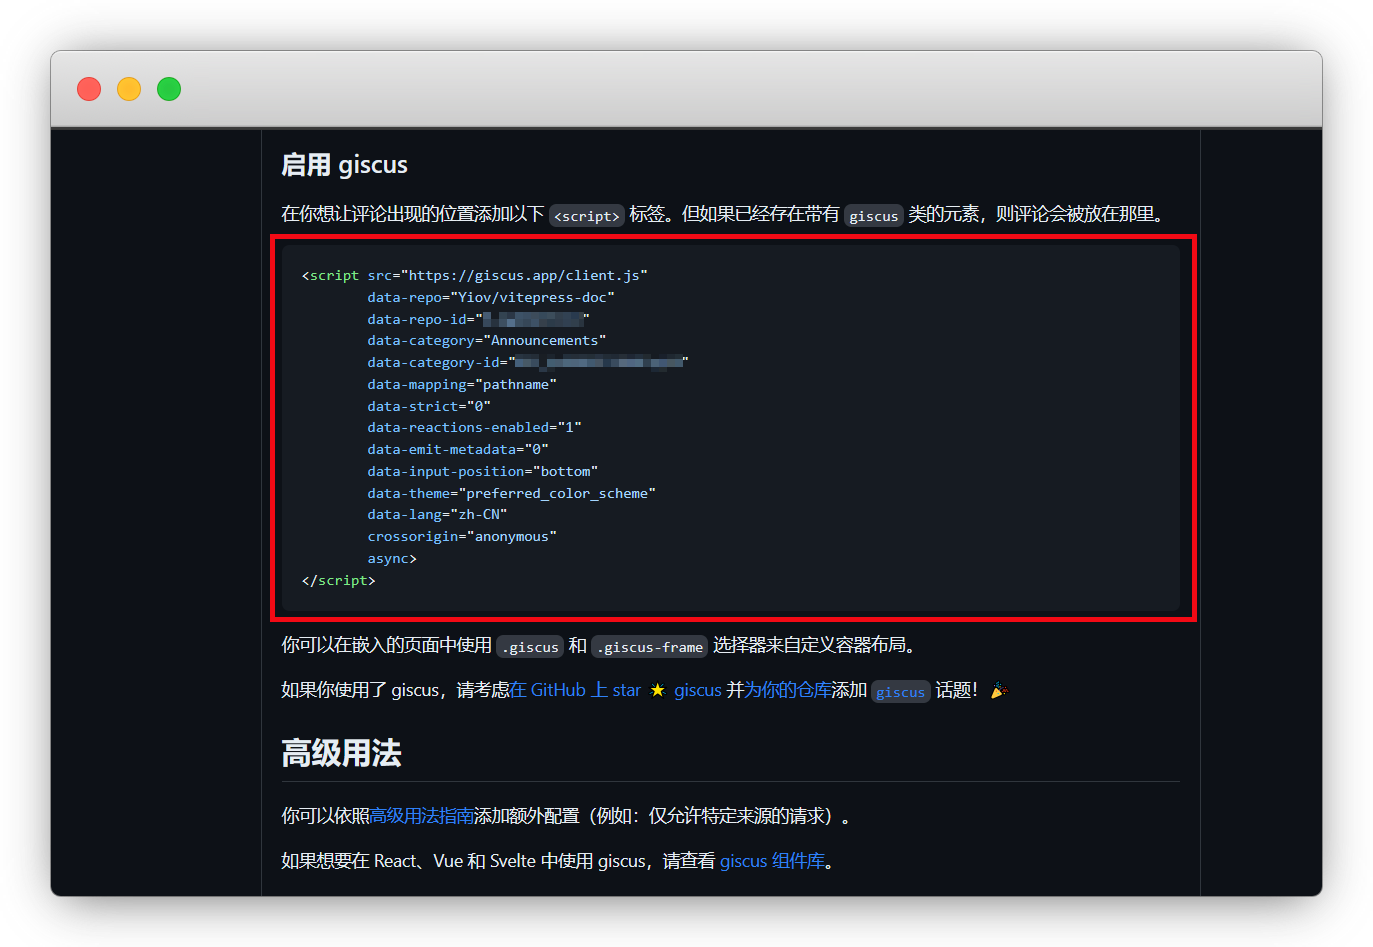
其中 data-repo 、 data-repo-id 、 data-category 和 data-category-id 这4个是我们的关键数据
<script src="https://giscus.app/client.js"
        data-repo="github repository"
        data-repo-id="R_******"
        data-category="General"
        data-category-id="DIC_******"
        data-mapping="pathname"
        data-strict="0"
        data-reactions-enabled="1"
        data-emit-metadata="0"
        data-input-position="bottom"
        data-theme="preferred_color_scheme"
        data-lang="zh-CN"
        data-loading="lazy"
        crossorigin="anonymous"
        async>
</script>安装使用
有能力的可以用官方给的js数据封装
我这里用 @T-miracle/vitepress-plugin-comment-with-giscus 的插件
pnpm add -D vitepress-plugin-comment-with-giscusyarn add -D vitepress-plugin-comment-with-giscusnpm install vitepress-plugin-comment-with-giscusbun add -D vitepress-plugin-comment-with-giscus在 .vitepress/theme/index.ts 中填入下面代码
并将我们之前获取的4个关键数据填入,其他保持默认保存
// .vitepress/theme/index.ts
import DefaultTheme from 'vitepress/theme';
import giscusTalk from 'vitepress-plugin-comment-with-giscus';
import { useData, useRoute } from 'vitepress';

export default {
  extends: DefaultTheme,

  setup() {
    // Get frontmatter and route
    const { frontmatter } = useData();
    const route = useRoute();

    // giscus配置
    giscusTalk({
      repo: 'your github repository', //仓库
      repoId: 'your repository id', //仓库ID
      category: 'Announcements', // 讨论分类
      categoryId: 'your category id', //讨论分类ID
      mapping: 'pathname',
      inputPosition: 'bottom',
      lang: 'zh-CN',
      },
      {
        frontmatter, route
      },
      //默认值为true,表示已启用,此参数可以忽略;
      //如果为false,则表示未启用
      //您可以使用“comment:true”序言在页面上单独启用它
      true
    );

}看下底部的效果吧
如果某一页不想启用
我们可以在当前页使用 Frontmatter 关闭
---
comment: false
---