布局插槽
更新: 10/11/2025 字数: 0 字 时长: 0 分钟
简介
Vitepress基于Vue3用到了 <slot> 插槽,在 <Layout/> 布局组件中预留了一些插槽,可以对页面布局进行自定义修改
由于也是使用组件,请了解过 组件的使用 了再来看
插槽与组件的区别
插槽:有固定的孔位,适用于需要频繁显示的内容,比如:广告
组件:无固定的孔位,适用于单次或少次显示内容,比如:视频播放
示例
开始前,请确保你安装了 vue ,已安装的无视
pnpm add -D vueyarn add -D vuenpm i vuebun add -D vue一般使用上就是: Layout 赋值 和 h函数 渲染
| 方式 | 来源 | 类型 | 插槽位置 |
|---|---|---|---|
| Layout | 内置框架 | 静态 | 写在组件中 |
| h函数 | Vue框架 | 动态,可以添加逻辑,传递props | 写在配置文件中 |
Layout
我们来做一个简单的示例
在 .vitepress/theme/components 目录新建一个 MyComponent.vue 组件
docs
├─ .vitepress
│  └─ config.mts
│  └─ theme
│  │   ├─ components
│  │   │   └─ MyComponent.vue    <-- 插槽组件
│  │   └─ index.ts
└─ index.md复制下面代码并保存
<script setup lang="ts">
import DefaultTheme from 'vitepress/theme'
const { Layout } = DefaultTheme
</script>

<template>
    <Layout>
        <!-- 插槽 -->
        <template #aside-outline-before>
          <!-- 这里写内容,下面是一个简单示例 -->
          <div class="title">我是aside-outline-before</div>
        </template>
    </Layout>
</template>

<style>
.title {
    color: red;
}
</style>在 .vitepress/theme/index.ts 中引入生效
// .vitepress/theme/index.ts
import DefaultTheme from 'vitepress/theme'
import MyComponent from './components/MyComponent.vue' // 导入组件

export default {
  extends: DefaultTheme,
  Layout: MyComponent, // 应用组件
}但是这样只能单个使用,不适用组件多的情况
我们可以按照单组件的模板,将插槽组件集中在一起
在 .vitepress/theme/components 目录新建一个 MyLayout.vue 布局组件
docs
├─ .vitepress
│  └─ config.mts
│  └─ theme
│  │   ├─ components
│  │   │   └─ MyLayout.vue    <-- 布局组件
│  │   └─ index.ts
└─ index.md将需要的组件导入,书写格式如下:
<!-- .vitepress/theme/MyLayout.vue -->
<script setup lang="ts">
import DefaultTheme from 'vitepress/theme'
// 组件1、2、3
import MyComponent from "./MyComponent.vue";
import MyComponent2 from "./MyComponent2.vue";
import MyComponent3 from "./MyComponent3.vue";
</script>

<template>
  <DefaultTheme.Layout v-bind="$attrs">

    <!-- doc-footer-before插槽1个组件 -->
    <template #doc-footer-before>
      <MyComponent />
    </template>

    <!-- layout-top插槽2个组件 -->
    <template #layout-top>
      <MyComponent2 />
      <MyComponent3 />
    </template>

  </DefaultTheme.Layout>
</template>

<style scoped>
</style>最后在 .vitepress/theme/index.ts 中引入生效
// .vitepress/theme/index.ts
import DefaultTheme from 'vitepress/theme'
import MyLayout from './components/MyLayout.vue' // 导入布局组件

export default {
  extends: DefaultTheme,
  Layout: MyLayout, // 应用布局组件
}h函数
由于h函数是Vue渲染层的底层 API,不需要写入 <slot> 插槽
直接导入现成的vue组件,在 .vitepress/theme/index.ts 中引入生效
// .vitepress/theme/index.ts
import DefaultTheme from 'vitepress/theme'
import { h } from 'vue' // h函数
// 组件1、2、3、4
import MyComponent from "./MyComponent.vue";
import MyComponent2 from "./MyComponent2.vue";
import MyComponent3 from "./MyComponent3.vue";
import MyComponent3 from "./MyComponent4.vue";

export default {
  extends: DefaultTheme,
  Layout() {
    return h(DefaultTheme.Layout, null, {

      // 指定组件使用aside-outline-before插槽
      'aside-outline-before': () => h(MyComponent),

      // 指定组件使用doc-before插槽
      'doc-before': () => h(MyComponent2),

      // 指定多个组件同时使用layout-top插槽
      'layout-top': () => [
        h(MyComponent3),
        h(MyComponent4),
        ],

    })
  }
}插槽表
不同的页面,可使用的插槽不同
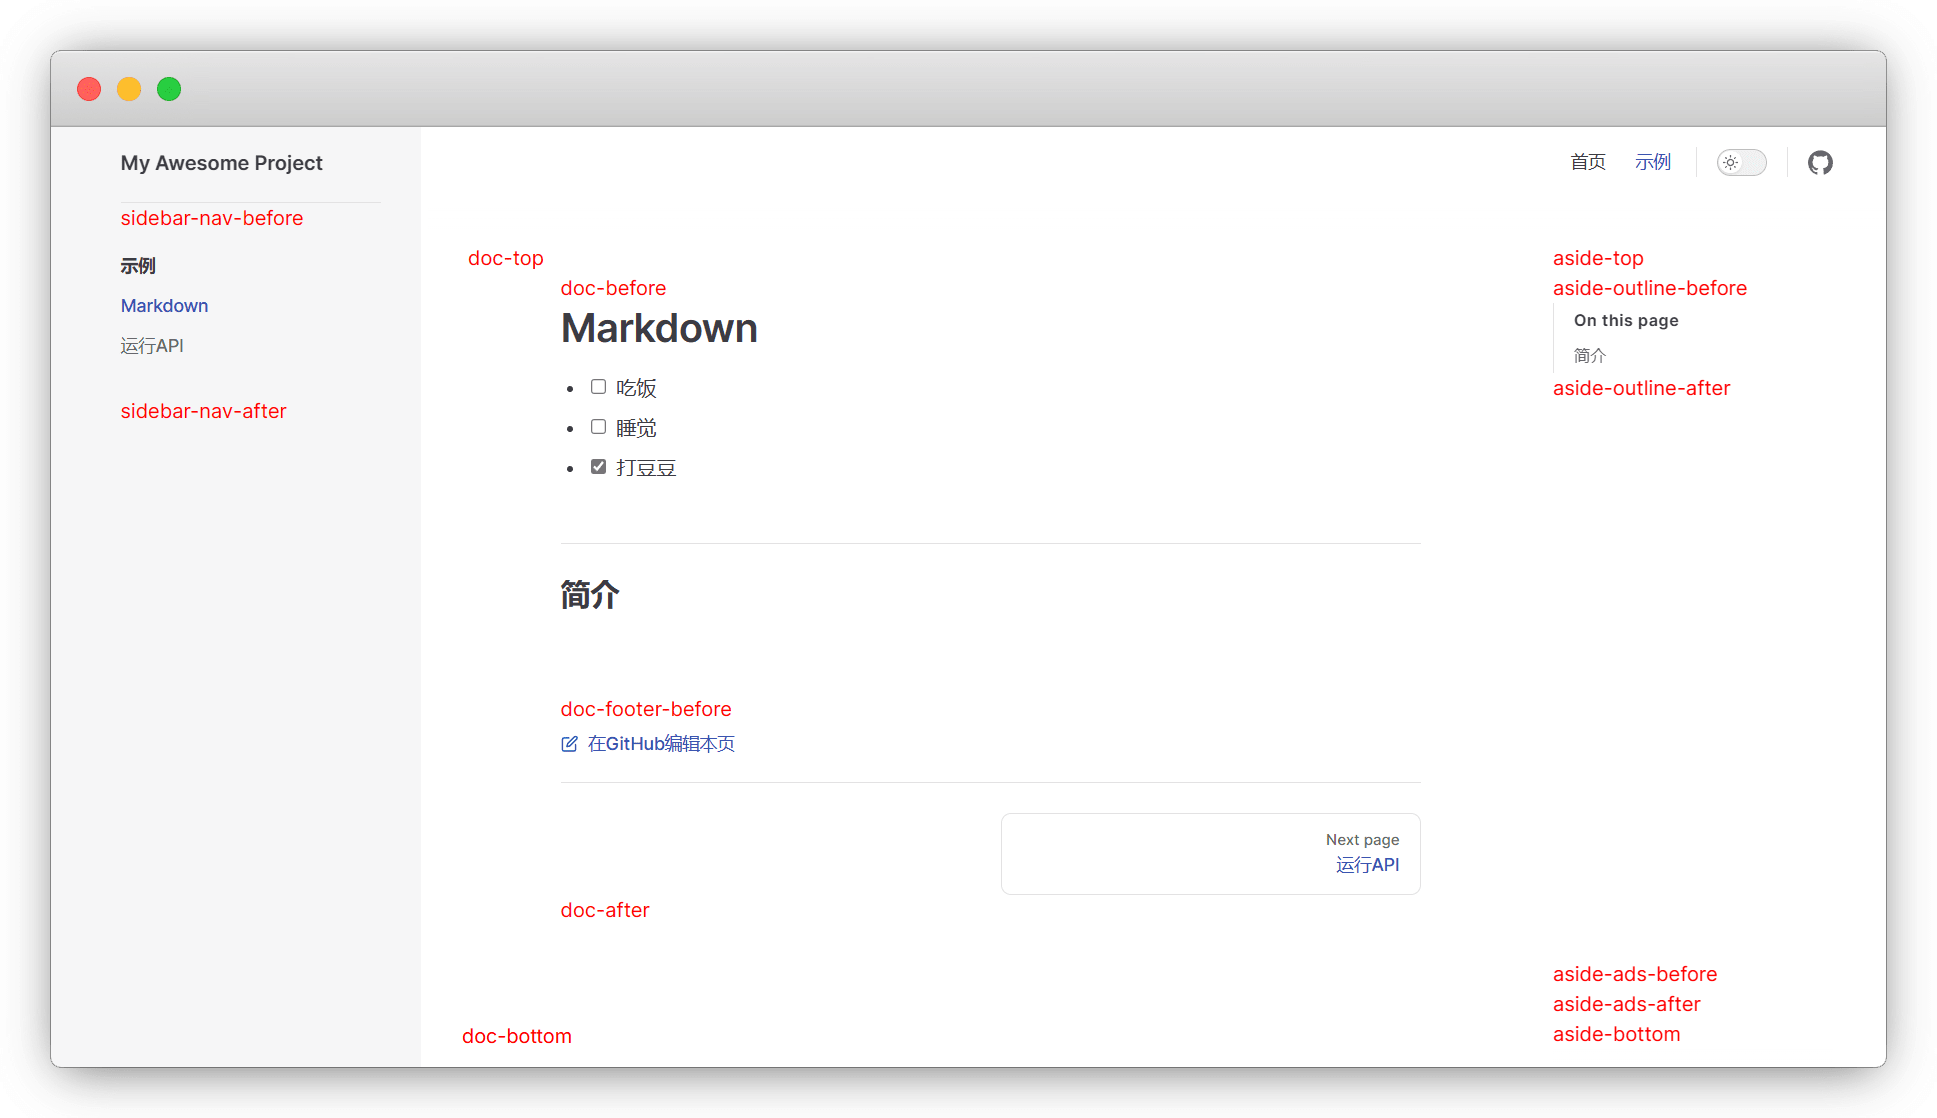
doc
当 Frontmatter 配置 layout: doc (默认)时插槽及位置
doc-top
doc-bottom
doc-footer-before
doc-before
doc-after
sidebar-nav-before
sidebar-nav-after
aside-top
aside-bottom
aside-outline-before
aside-outline-after
aside-ads-before
aside-ads-after
home
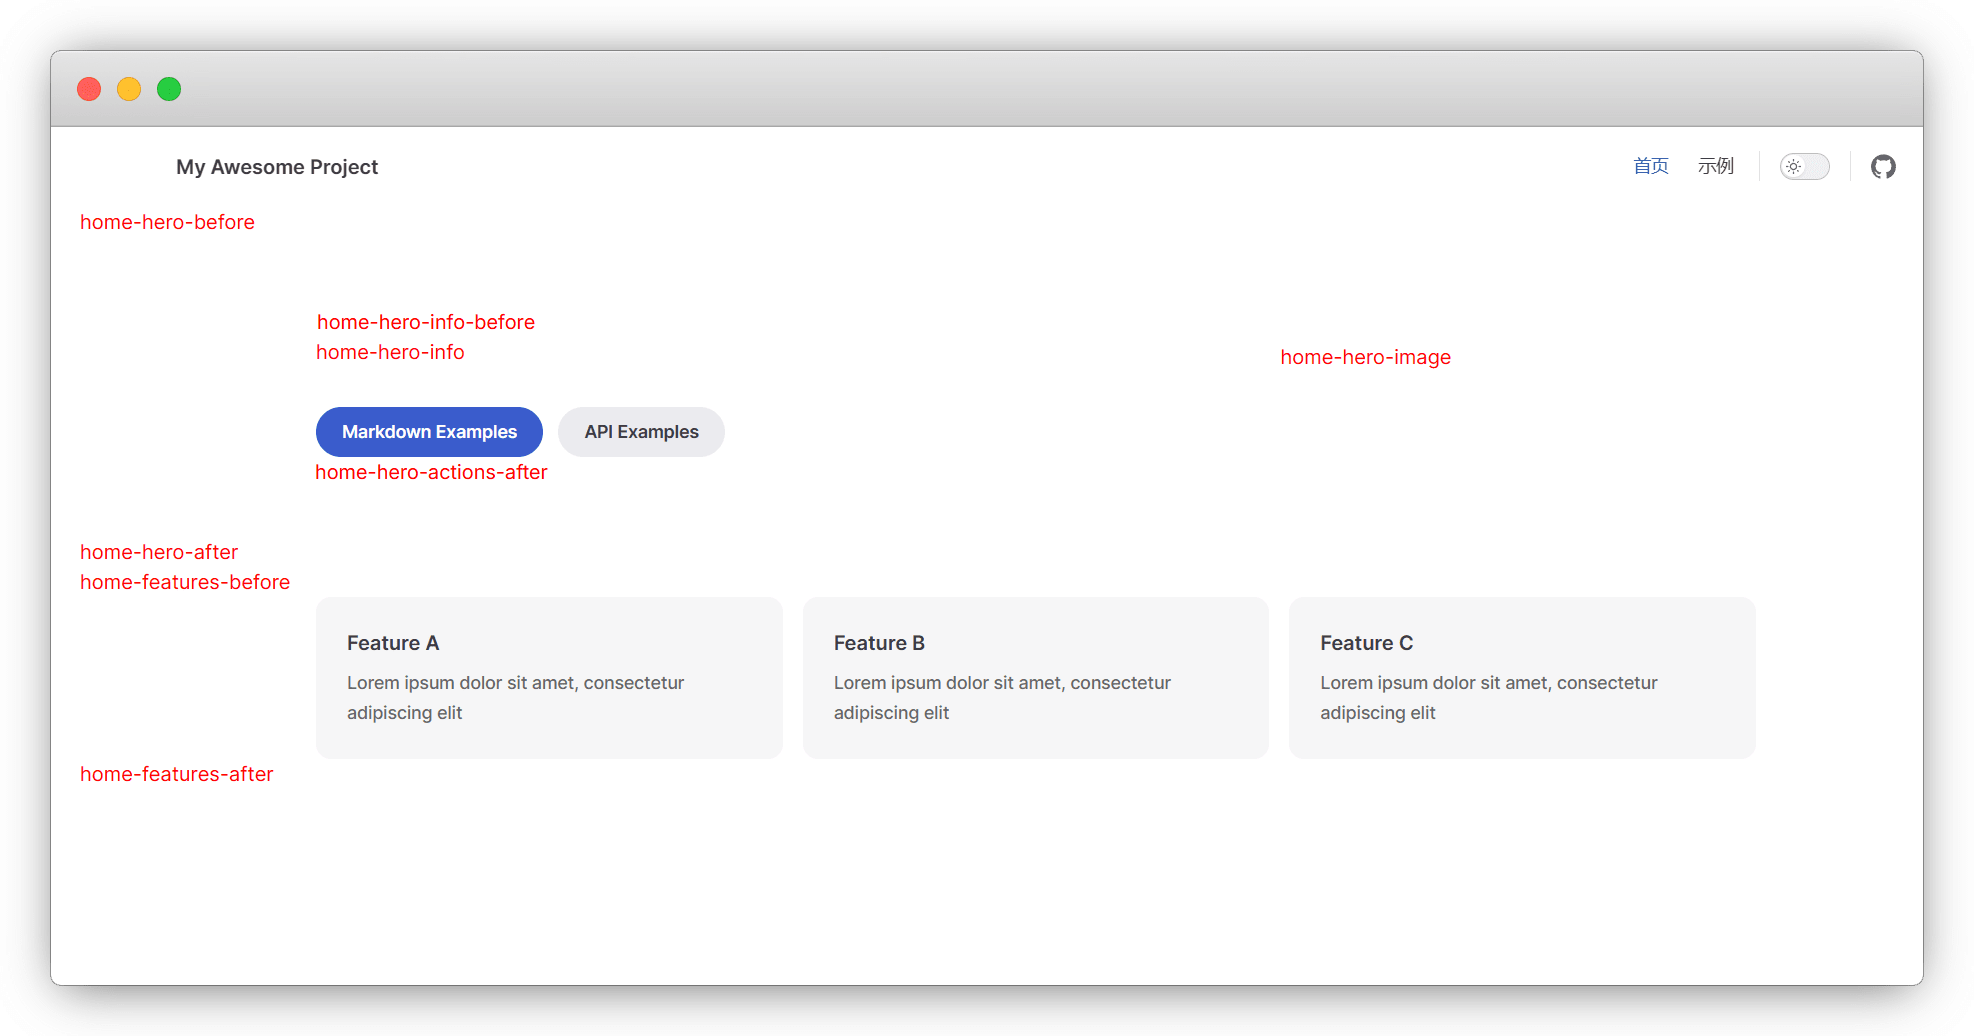
当 Frontmatter 配置 layout: home (默认)时插槽及位置
- home-hero-before
- home-hero-info
- home-hero-image
- home-hero-after
- home-features-before
- home-features-after
page
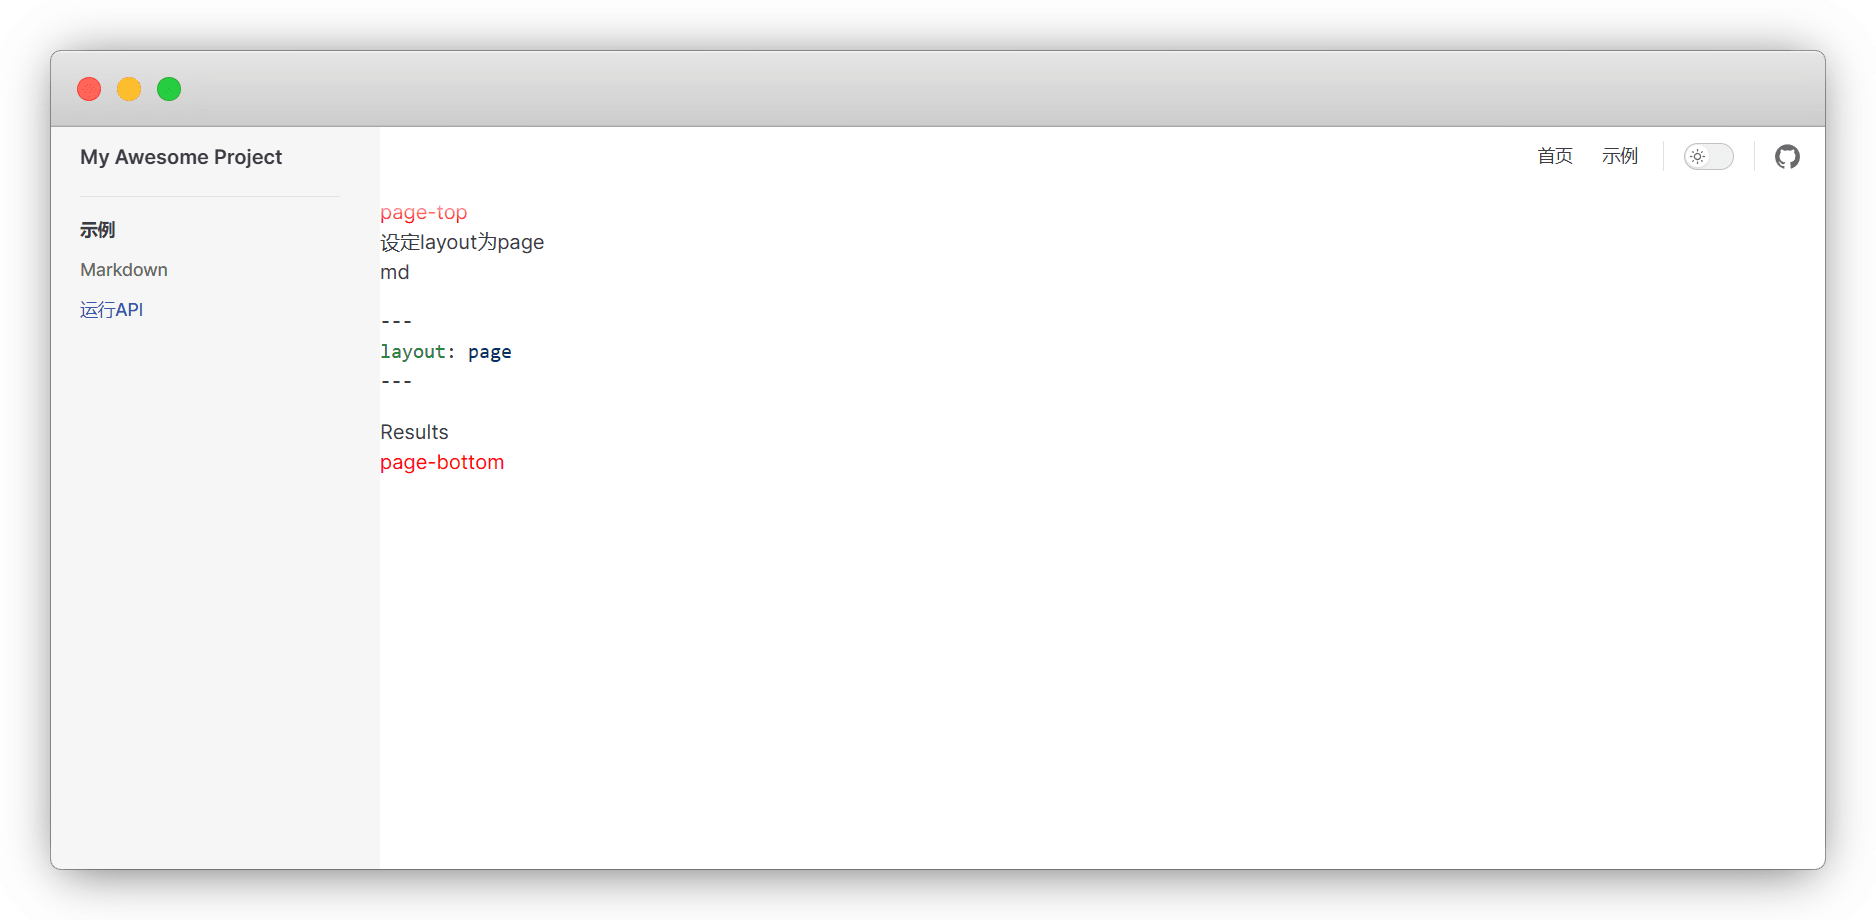
当 Frontmatter 配置 layout: page (默认)时插槽及位置
- page-top
- page-bottom
404
在未找到 (404) 页面上
- not-found

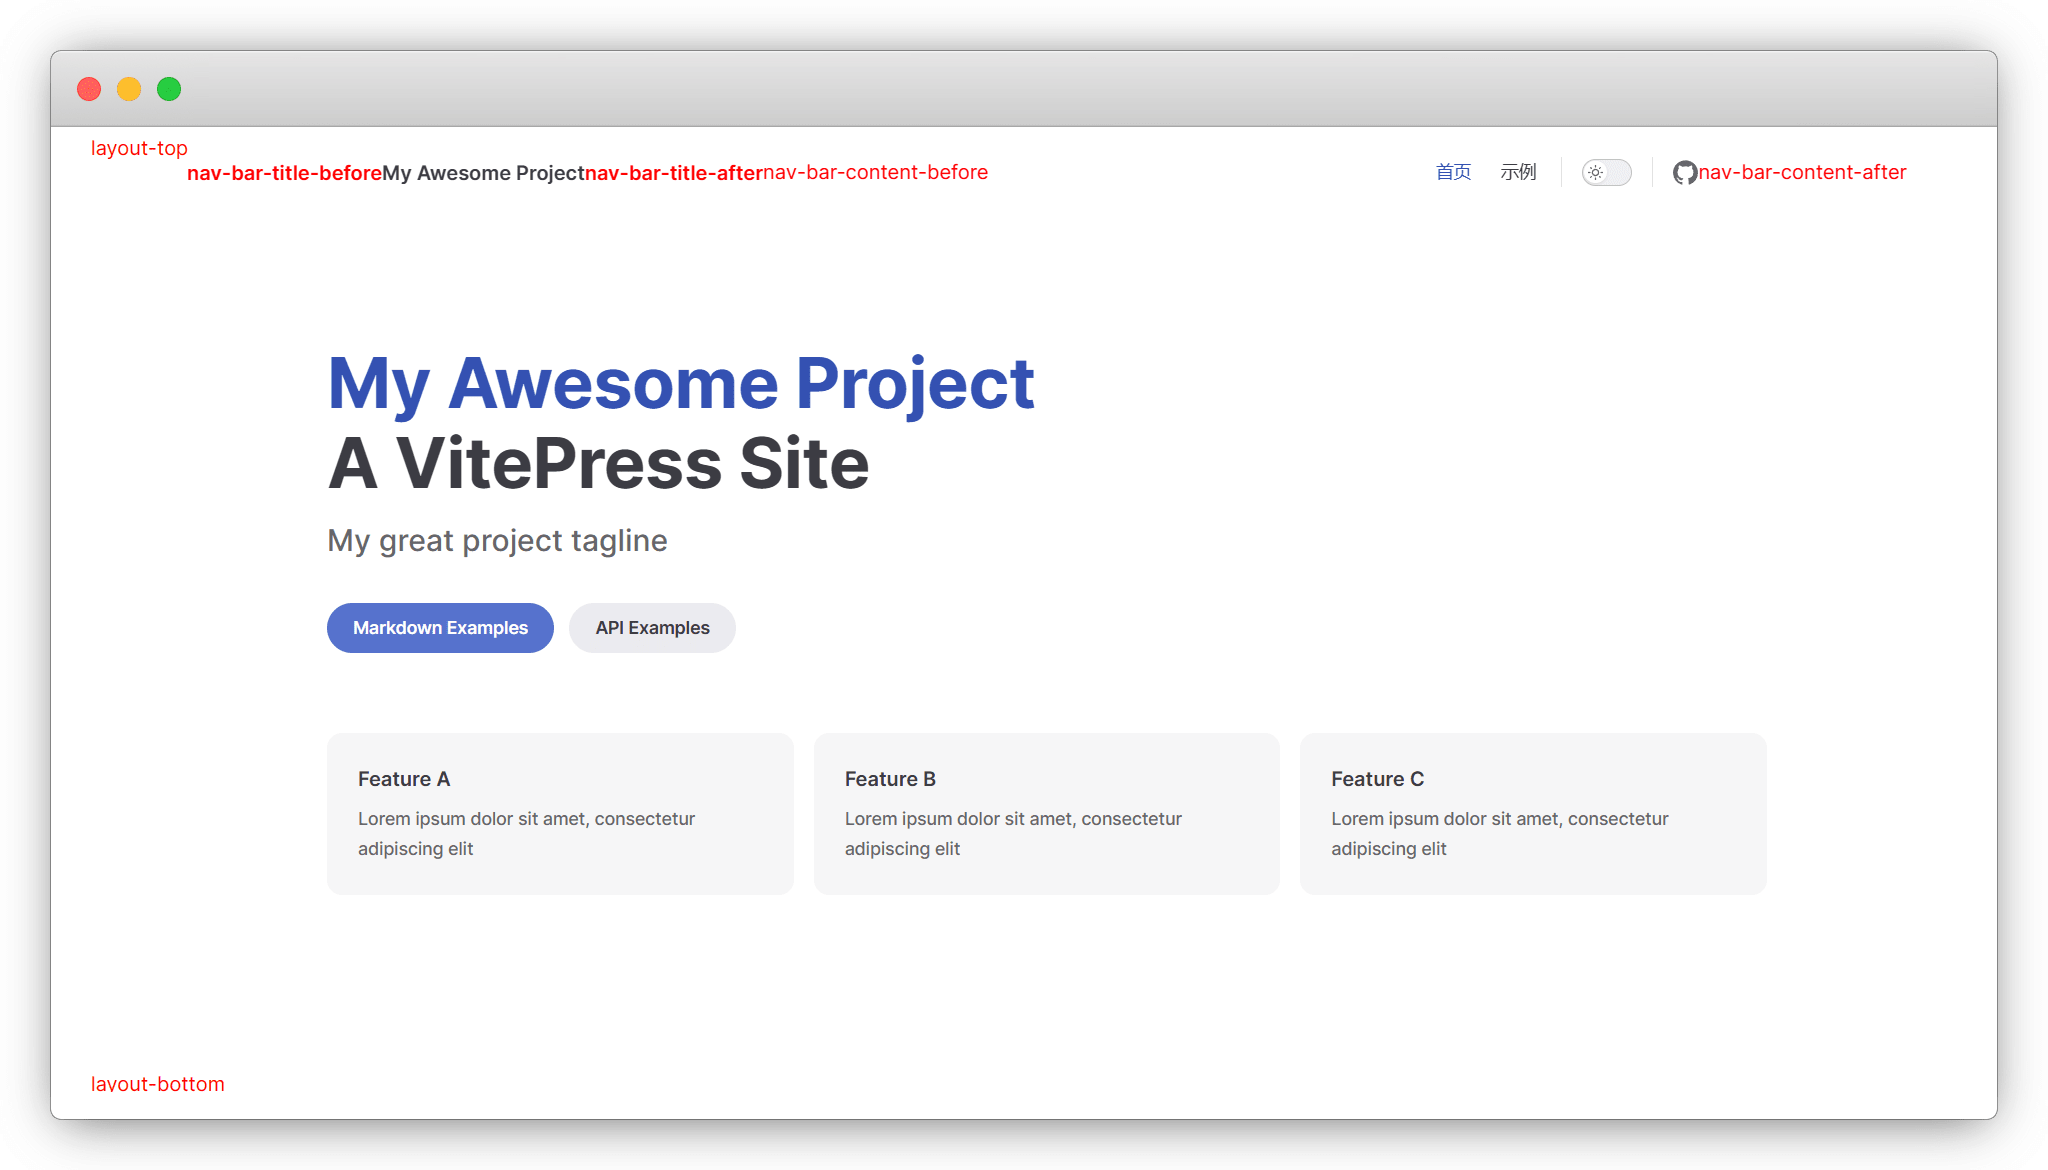
Always
所有布局均可使用
layout-top
layout-bottom
nav-bar-title-before
nav-bar-title-after
nav-bar-content-before
nav-bar-content-after
nav-screen-content-before
nav-screen-content-after
使用演示
Frontmatter
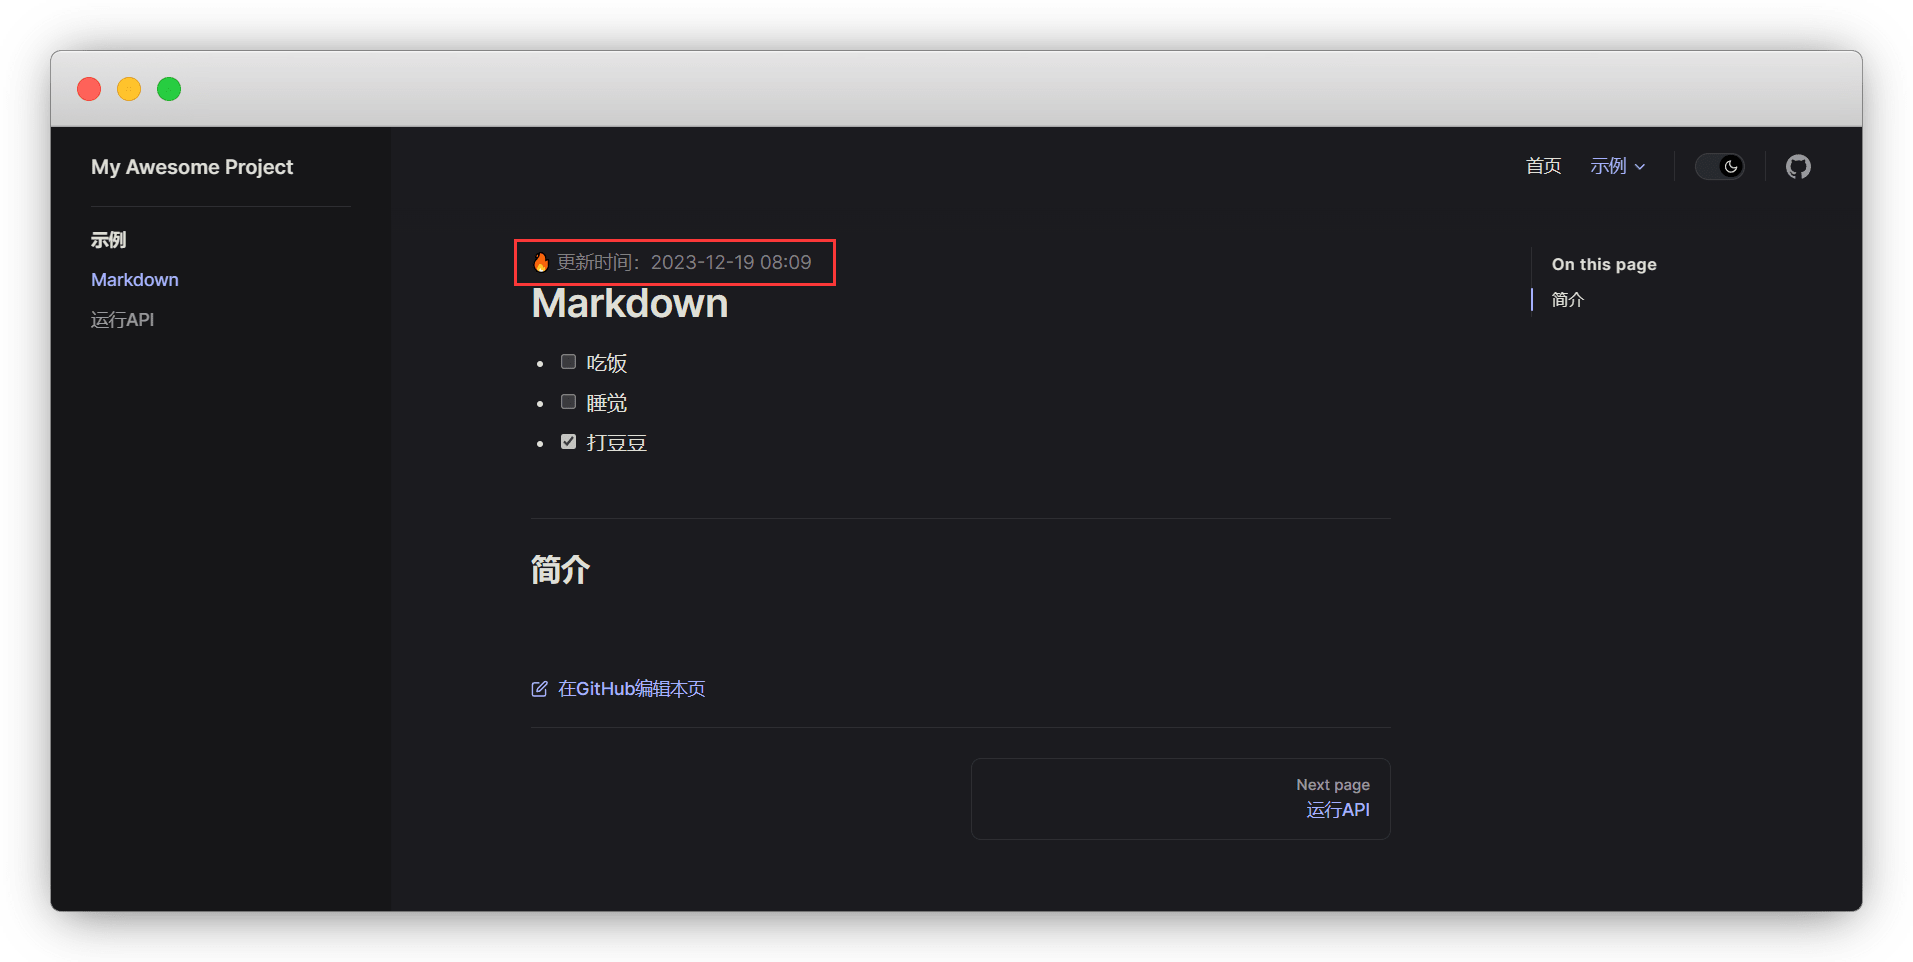
本方法参考 掘金 @Younglina 的文章,通过VitePress官网给出的 useDate 返回页面数据,可以看到返回对象的类型
interface VitePressData {
  site: Ref<SiteData>
  page: Ref<PageData>
  theme: Ref<any> // themeConfig from .vitepress/config.js
  frontmatter: Ref<PageData['frontmatter']>
  lang: Ref<string>
  title: Ref<string>
  description: Ref<string>
  localePath: Ref<string>
}我这里仅演示 frontmatter 使用,其他的同理
在 .vitepress/theme/components 目录新建一个 tags.vue 组件
docs
├─ .vitepress
│  └─ config.mts
│  └─ theme
│  │   ├─ components
│  │   │   └─ tags.vue
│  │   └─ index.ts
└─ index.md粘贴如下代码,并保存
<script setup lang="ts">
import { useData } from 'vitepress'
const { frontmatter } = useData()
</script>
<template>
<span v-if="frontmatter.date" class="fdate">🔥 更新时间:{{ frontmatter.date }}</span>
</template>
<style>
.fdate {
font-size: 15px;
color: #7f7f7f;
margin-right: 10px;
}
</style>此处的使用的是 doc-before 插槽,配置方式按需选择
<!-- .vitepress/theme/MyLayout.vue -->
<script setup lang="ts">
import DefaultTheme from 'vitepress/theme'
// 组件
import tags from "./tags.vue";
</script>

<template>
  <DefaultTheme.Layout v-bind="$attrs">

    <!-- doc-before插槽 -->
    <template #doc-before>
      <tags />
    </template>

  </DefaultTheme.Layout>
</template>

<style scoped>
</style>// .vitepress/theme/index.ts
import DefaultTheme from 'vitepress/theme'
import { h } from 'vue' // h函数
// 组件
import tags from "./components/tags.vue";
export default {
extends: DefaultTheme,
Layout() {
return h(DefaultTheme.Layout, null, {
// 指定组件使用doc-before插槽
'doc-before': () => h(tags),
})
}
}最后在任意 *.md 文章顶部使用 Frontmatter
---
date: 2023-12-19 08:09
---查看效果
Vite官网赞助

在 untils 目录新建一个 sponsors.ts 文件
docs
├─ .vitepress
│  └─ config.mts
│  └─ theme
│  │   ├─ components
│  │   ├─ untils
│  │   │   └─ sponsors.ts    <-- ts文件
│  │   └─ index.ts
└─ index.md粘贴如下代码,保存
import { ref, onMounted } from 'vue'

interface Sponsors {
  special: Sponsor[]
  platinum: Sponsor[]
  platinum_china: Sponsor[]
  gold: Sponsor[]
  silver: Sponsor[]
  bronze: Sponsor[]
}

interface Sponsor {
  name: string
  img: string
  url: string
}

// shared data across instances so we load only once.
const data = ref()

const dataHost = 'https://sponsors.vuejs.org'
const dataUrl = `${dataHost}/vite.json`

const viteSponsors: Pick<Sponsors, 'special' | 'gold'> = {
  special: [
    // sponsors patak-dev
    {
      name: 'StackBlitz',
      url: 'https://stackblitz.com',
      img: '/svg/stackblitz.svg',
    },
    // sponsors antfu
    {
      name: 'NuxtLabs',
      url: 'https://nuxtlabs.com',
      img: '/svg/nuxtlabs.svg',
    },
    // sponsors bluwy
    {
      name: 'Astro',
      url: 'https://astro.build',
      img: '/svg/astro.svg',
    },
  ],
  gold: [
    // through GitHub -> OpenCollective
    {
      name: 'Remix',
      url: 'https://remix.run/',
      img: '/svg/remix.svg',
    },
  ],
}

export function useSponsor() {
  onMounted(async () => {
    if (data.value) {
      return
    }

    const result = await fetch(dataUrl)
    const json = await result.json()

    data.value = mapSponsors(json)
  })

  return {
    data,
  }
}

function mapSponsors(sponsors: Sponsors) {
  return [
    {
      tier: 'Special Sponsors',
      size: 'big',
      items: viteSponsors['special'],
    },
    {
      tier: 'Platinum Sponsors',
      size: 'big',
      items: mapImgPath(sponsors['platinum']),
    },
    {
      tier: 'Gold Sponsors',
      size: 'medium',
      items: viteSponsors['gold'].concat(mapImgPath(sponsors['gold'])),
    },
  ]
}

const viteSponsorNames = new Set(
  Object.values(viteSponsors).flatMap((sponsors) =>
    sponsors.map((s) => s.name),
  ),
)

/**
 * Map Vue/Vite sponsors data to objects and filter out Vite-specific sponsors
 */
function mapImgPath(sponsors: Sponsor[]) {
  return sponsors
    .filter((sponsor) => !viteSponsorNames.has(sponsor.name))
    .map((sponsor) => ({
      ...sponsor,
      img: `${dataHost}/images/${sponsor.img}`,
    }))
}然后我们将 赞助商的图片 放入 public - svg 文件夹
docs
├─ .vitepress
│  └─ config.mts
│  └─ theme
├─ public
│  └─ svg      <-- 赞助商svg文件
└─ index.md在 components 目录新建 HomeSponsors.vue 组件
docs
├─ .vitepress
│  └─ config.mts
│  └─ theme
│  │   ├─ components
│  │   │   └─ HomeSponsors.vue    <-- 插槽组件
│  │   └─ index.ts
└─ index.md粘贴如下代码,保存
<script setup lang="ts">
import { VPHomeSponsors } from 'vitepress/theme'
import { useSponsor } from '../untils/sponsors'

const { data } = useSponsor()
</script>

<template>
  <VPHomeSponsors
    v-if="data"
    message="Vite is free and open source, made possible by wonderful sponsors."
    :data="data"
  />
  <div class="action">
    <a
      class="sponsor"
      href="https://github.com/sponsors/vitejs"
      target="_blank"
      rel="noreferrer"
    >
      Sponsor Vite
    </a>
    <a
      class="sponsor"
      href="https://github.com/sponsors/yyx990803"
      target="_blank"
      rel="noreferrer"
    >
      Sponsor Evan You
    </a>
  </div>
</template>

<style scoped>
.action {
  display: flex;
  justify-content: center;
  gap: 1rem;
  padding-top: 4rem;
}

.sponsor {
  /* .VPButton */
  display: inline-block;
  border: 1px solid transparent;
  text-align: center;
  font-weight: 600;
  white-space: nowrap;
  transition:
    color 0.25s,
    border-color 0.25s,
    background-color 0.25s;
  /* .VPButton.medium */
  border-radius: 20px;
  padding: 0 20px;
  line-height: 38px;
  font-size: 14px;
  /* .VPButton.sponsor */
  border-color: var(--vp-button-sponsor-border);
  color: var(--vp-button-sponsor-text);
  background-color: var(--vp-button-sponsor-bg);
}

.sponsor:hover {
  /* .VPButton.sponsor:hover */
  border-color: var(--vp-button-sponsor-hover-border);
  color: var(--vp-button-sponsor-hover-text);
  background-color: var(--vp-button-sponsor-hover-bg);
}
</style>最后我们使用 home-features-after 插槽,按需配置即可
<!-- .vitepress/theme/MyLayout.vue -->
<script setup lang="ts">
import DefaultTheme from 'vitepress/theme'
// 组件1
import HomeSponsors from "./HomeSponsors.vue";
</script>

<template>
  <DefaultTheme.Layout v-bind="$attrs">

    <!-- home-features-after插槽 -->
    <template #home-features-after>
      <HomeSponsors />
    </template>

  </DefaultTheme.Layout>
</template>

<style scoped>
</style>// .vitepress/theme/index.ts
import DefaultTheme from 'vitepress/theme'
import { h } from 'vue' // h函数
// 组件
import HomeSponsors from './components/HomeSponsors.vue'
export default {
extends: DefaultTheme,
Layout() {
return h(DefaultTheme.Layout, null, {
// 指定组件使用home-features-after插槽
'home-features-after': () => h(HomeSponsors),
})
}
}不蒜子
使用前请安装 浏览量的插件:不蒜子 ,想好看自己研究一下吧
现在仅做一个简单的封装示例,新建一个 bsz.vue 组件
docs
├─ .vitepress
│  └─ config.mts
│  └─ theme
│  │   ├─ components
│  │   │   └─ bsz.vue    <--浏览量组件
│  │   └─ index.ts
└─ index.md选择一种方式,复制代码,粘贴到 bsz.vue 中
<template>
  <div class="busuanzi">
    本站访客数 <span id="busuanzi_value_site_uv" /> 人次 本站总访问量 <span id="busuanzi_value_site_pv" /> 次
  </div>
</template>

<style>
.busuanzi {
  font-size: 15px;
  color: gray;
  text-align: center;
}
</style>此处的使用的是 layout-bottom 插槽,配置方式按需选择
<!-- .vitepress/theme/MyLayout.vue -->
<script setup lang="ts">
import DefaultTheme from 'vitepress/theme'
// 组件
import bsz from "./bsz.vue";
</script>

<template>
  <DefaultTheme.Layout v-bind="$attrs">

    <!-- layout-bottom插槽 -->
    <template #layout-bottom>
      <bsz />
    </template>

  </DefaultTheme.Layout>
</template>

<style scoped>
</style>// .vitepress/theme/index.ts
import DefaultTheme from 'vitepress/theme'
import { h } from 'vue' // h函数
// 组件
import bsz from "./components/bsz.vue";
export default {
extends: DefaultTheme,
Layout() {
return h(DefaultTheme.Layout, null, {
// 指定组件使用layout-bottom插槽
'layout-bottom': () => h(bsz),
})
}
}最后还需要额外添加路由监听,在 theme/index.ts 中如下配置即可
说明
本地开发出现数字即算成功,等你部署后会显示正确的数值
// .vitepress/theme/index.ts
import DefaultTheme from 'vitepress/theme'

// 不蒜子
import bsz from "./components/bsz.vue"
import { inBrowser } from 'vitepress'
import busuanzi from 'busuanzi.pure.js'

export default {
  extends: DefaultTheme,

  // 不蒜子
  enhanceApp({ app , router }) {
    if (inBrowser) {
      router.onAfterRouteChanged = () => {
        busuanzi.fetch()
      }
    }
  },

}返回顶部
主要是移动端不方便,虽然大纲栏有 Return to top,但是得点一下
这里我们参考 @wf0/monaco-editor-translate 的 backTop 组件,加了一个下滑进度条显示
在 theme/components 文件夹,新建 backtotop.vue 组件
docs
├─ .vitepress
│  └─ config.mts
│  └─ theme
│  │   ├─ components
│  │   │   └─ backtotop.vue
│  │   └─ index.ts
└─ index.md在 backtotop.vue 填入如下代码,保存
<script setup>
import { onBeforeUnmount, onMounted, ref, computed } from "vue";

const showBackTop = ref(false); // 初始状态设为false
const scrollProgress = ref(0);

// 圆形进度条计算
const radius = 42;
const circumference = computed(() => 2 * Math.PI * radius);

function scrollToTop() {
  window.scrollTo({
    top: 0,
    behavior: "smooth",
  });
}

// 使用更高效的节流函数
function throttle(fn, delay = 50) {
  let timer = null;
  return function(...args) {
    if (!timer) {
      timer = setTimeout(() => {
        fn.apply(this, args);
        timer = null;
      }, delay);
    }
  };
}

const updateScrollProgress = () => {
  const { scrollY, innerHeight } = window;
  const { scrollHeight } = document.documentElement;
  const totalScroll = scrollHeight - innerHeight;
  scrollProgress.value = totalScroll > 0 ? Math.min(scrollY / totalScroll, 1) : 0;
};

const handleScroll = throttle(() => {
  // 当滚动超过100px时显示,否则隐藏
  const shouldShow = window.scrollY > 100;
  showBackTop.value = shouldShow;
  updateScrollProgress();
});

onMounted(() => {
  window.addEventListener("scroll", handleScroll);
  updateScrollProgress();
});

onBeforeUnmount(() => {
  window.removeEventListener("scroll", handleScroll);
});
</script>

<template>
  <Transition name="fade">
    <div class="back-top-container" v-show="showBackTop">
      <svg class="progress-ring" viewBox="0 0 100 100">
        <circle class="progress-ring-background" cx="50" cy="50" r="42" />
        <circle
          class="progress-ring-circle"
          cx="50"
          cy="50"
          r="42"
          :style="{'stroke-dashoffset': circumference - (scrollProgress * circumference)}"
        />
      </svg>
      <div
        class="vitepress-backTop-main"
        title="返回顶部"
        @click="scrollToTop()"
      >
        <svg class="icon" viewBox="0 0 1024 1024">
          <path d="M752.736 431.063C757.159 140.575 520.41 8.97 504.518 0.41V0l-0.45 0.205-0.41-0.205v0.41c-15.934 8.56-252.723 140.165-248.259 430.653-48.21 31.457-98.713 87.368-90.685 184.074 8.028 96.666 101.007 160.768 136.601 157.287 35.595-3.482 25.232-30.31 25.232-30.31l12.206-50.095s52.47 80.569 69.304 80.528c15.114-1.23 87-0.123 95.6 0h0.82c8.602-0.123 80.486-1.23 95.6 0 16.794 0 69.305-80.528 69.305-80.528l12.165 50.094s-10.322 26.83 25.272 30.31c35.595 3.482 128.574-60.62 136.602-157.286 8.028-96.665-42.475-152.617-90.685-184.074z m-248.669-4.26c-6.758-0.123-94.781-3.359-102.891-107.192 2.95-98.714 95.97-107.438 102.891-107.93 6.964 0.492 99.943 9.216 102.892 107.93-8.11 103.833-96.174 107.07-102.892 107.192z m-52.019 500.531c0 11.838-9.42 21.382-21.012 21.382a21.217 21.217 0 0 1-21.054-21.34V821.74c0-11.797 9.421-21.382 21.054-21.382 11.591 0 21.012 9.585 21.012 21.382v105.635z m77.333 57.222a21.504 21.504 0 0 1-21.34 21.626 21.504 21.504 0 0 1-21.34-21.626V827.474c0-11.96 9.543-21.668 21.299-21.668 11.796 0 21.38 9.708 21.38 21.668v157.082z m71.147-82.043c0 11.796-9.42 21.34-21.053 21.34a21.217 21.217 0 0 1-21.013-21.34v-75.367c0-11.755 9.421-21.299 21.013-21.299 11.632 0 21.053 9.544 21.053 21.3v75.366z" fill="#FFF"/>
        </svg>
      </div>
    </div>
  </Transition>
</template>

<style scoped>
.back-top-container {
  position: fixed;
  bottom: 20px;
  right: 20px;
  width: 60px;
  height: 60px;
  z-index: 999;
}

.vitepress-backTop-main {
  position: absolute;
  top: 50%;
  left: 50%;
  transform: translate(-50%, -50%);
  cursor: pointer;
  width: 44px;
  height: 44px;
  border-radius: 50%;
  background-color: #3eaf7c;
  padding: 8px;
  box-shadow: 0 2px 8px rgba(0, 0, 0, 0.15);
  display: flex;
  align-items: center;
  justify-content: center;
  z-index: 2;
  transition: background-color 0.2s ease;
}

.vitepress-backTop-main:hover {
  background-color: #71cda3;
}

.progress-ring {
  position: absolute;
  width: 100%;
  height: 100%;
  transform: rotate(-90deg);
  z-index: 1;
}

.progress-ring-background {
  fill: none;
  stroke: rgba(62, 175, 124, 0.15);
  stroke-width: 3;
}

.progress-ring-circle {
  fill: none;
  stroke: #3eaf7c;
  stroke-width: 3;
  stroke-dasharray: 264; /* 2 * π * 42 */
  stroke-linecap: round;
  transition: stroke-dashoffset 0.15s ease-out;
}

.icon {
  width: 24px;
  height: 24px;
}

.fade-enter-active,
.fade-leave-active {
  transition: opacity 0.3s ease;
}

.fade-enter-from,
.fade-leave-to {
  opacity: 0;
}
</style>此处的使用的是 doc-footer-before 插槽,配置方式按需选择
<!-- .vitepress/theme/MyLayout.vue -->
<script setup lang="ts">
import DefaultTheme from 'vitepress/theme'
// 组件1
import backtotop from "./backtotop.vue";
</script>

<template>
  <DefaultTheme.Layout v-bind="$attrs">

    <!-- doc-footer-before插槽 -->
    <template #doc-footer-before>
      <backtotop />
    </template>

  </DefaultTheme.Layout>
</template>

<style scoped>
</style>// .vitepress/theme/index.ts
import DefaultTheme from 'vitepress/theme'
import { h } from 'vue' // h函数
// 组件1
import backtotop from "./components/backtotop.vue";
export default {
extends: DefaultTheme,
Layout() {
return h(DefaultTheme.Layout, null, {
// 指定组件使用doc-footer-before插槽
'doc-footer-before': () => h(backtotop),
})
}
}视图过渡
在官方的文档中,有这么一个 外观切换的示例,有点意思
在 MyLayout.vue 填入如下代码,保存
类型“Document”上不存在属性“startViewTransition”。
需要安装 @types/dom-view-transitions
pnpm add -D @types/dom-view-transitionsyarn add -D @types/dom-view-transitionsnpm i -D @types/dom-view-transitionsbun add -D @types/dom-view-transitions<!-- .vitepress/theme/MyLayout.vue -->
<script setup lang="ts">
import DefaultTheme from 'vitepress/theme'
import { useData } from 'vitepress'
import { nextTick, provide } from 'vue'
按需选择方式,在 index.ts 中配置即可
// .vitepress/theme/index.ts
import DefaultTheme from 'vitepress/theme'
import MyLayout from './components/MyLayout.vue'

export default {
  extends: DefaultTheme,
  Layout: MyLayout,
}// .vitepress/theme/index.ts
import DefaultTheme from 'vitepress/theme'
import { h } from 'vue' // h函数
// 组件1
import MyLayout from "./components/MyLayout.vue";
export default {
extends: DefaultTheme,
Layout() {
return h(MyLayout, null, {
// 这里是其他插槽组件
})
}
}最后,看看我用 StackBlitz 做的效果
为什么我的没效果?
自身问题:请仔细是否正确配置
电脑问题:我的电脑 - 右键
属性-高级系统设置- 在系统属性页卡中高级- 性能设置,默认为 调整为最佳外观,将窗口内的动画控件和元素打勾,确定(如果电脑字体变化,请调整为其他,只要确保勾选此项即可)
有关视图过渡动画的更多详细信息,请参阅 Chrome 文档 。
公告
找了一下公告的基本样式,整合了2个示例,仅供参考
说明
由于直接生扒的,很多东西都没仔细看,就做了一点点小改动,将就着用吧
当然你也可以自己写一个!
在 theme/components 文件夹,新建 notice.vue 组件
docs
├─ .vitepress
│  └─ config.mts
│  └─ theme
│  │   ├─ components
│  │   │   └─ notice.vue
│  │   └─ index.ts
└─ index.md在 notice.vue 填入如下代码,保存
说明
- VuePress-Reco:https://theme-reco.vuejs.press/
<script setup lang="ts">
import { ref } from 'vue'
const visible = ref(true)

function closetz() {
  visible.value = false
}

setTimeout(function () { visible.value = false }, 5000);
</script>

<template>
  <div v-if="visible" class="notice-background" style="display: block;"></div>
  <div v-if="visible" class="notice">
    <h3 class="notice-title">网站公告</h3>
    <div class="notice-describe">
      <p>本次更新:新公告样式</p>
      <p class="notice-domain">
        <strong>
          详细教程:<a href="https://vitepress.yiov.top/layout.html#%E5%85%AC%E5%91%8A"
            target="_blank">vitepress.yiov.top</a>
        </strong>
      </p>
      <p>QQ 频道:******(无效二维码)</p>
      <img class="notice-img" src="/qrcode.png">
    </div>
    <div class="notice-footer">
      <div class="notice-btn" @click="closetz">朕知道了</div>
    </div>
  </div>
</template>

<style scoped>
.notice-img {
  z-index: 9999
}

/* 全屏遮罩层 */
.notice-background {
  position: fixed;
  top: 0;
  left: 0;
  width: 100%;
  height: 100%;
  background-color: rgba(0, 0, 0, 0.5);
  display: none;
  z-index: 99;
  pointer-events: none;
}

/* 通知 */
.notice {
  z-index: 999;
  padding: 25px;
  background: #fff;
  width: 350px;
  position: fixed;
  top: 50%;
  left: 50%;
  transform: translateX(-50%) translateY(-50%);
  border-radius: 18px;
  box-sizing: border-box;
  box-shadow: 0 0.25rem 0.5rem rgba(0, 0, 0, 0.05), 0 1.5rem 2.2rem rgba(0, 0, 0, 0.1);
}

@media (max-width: 640px) {
  .notice {
    width: 82%;
    padding: 25px;
  }
}

.notice-title {
  text-align: center;
  color: #3c3c3c;
  font-size: 20px;
  font-weight: 900;
}

.notice-describe p {
  color: #3c3c3c;
  padding: 10px 0;
  font-size: 15px;
}

.notice-describe p strong {
  color: #3c3c3c;
}

.notice-describe p a {
  color: #eb0e0e;
}

.notice-domain {
  background: #f3f5f7;
  text-align: center;
  border-radius: 10px;
}

/* 通知底部 */
.notice-footer {
  padding: 20px 0 0;
  text-align: center;
}

.notice-btn {
  text-align: center;
  cursor: pointer;
  border-radius: 50px;
  font-weight: 700;
  padding: 0 30px;
  color: #fff;
  background: linear-gradient(to right, #1e69f5 0%, #093ce5 100%);
  box-shadow: 0 10px 12px -4px rgb(0 0 0 / 40%);
  line-height: 40px;
  font-size: 14px;
  display: inline-block;
  text-wrap: nowrap;
}
</style><script setup lang="ts">
import { ref } from 'vue'
const visible = ref(true)
function closeBulletin() {
visible.value = false
}
setTimeout(function () { visible.value = false }, 5000);
</script>
<template>
<div v-if="visible" class="bulletin-wrapper" style="width: 300px;">
<div class="bulletin-title">
<span class="bulletin-icon left">
<svg class="bulletin-icon" xmlns="http://www.w3.org/2000/svg" xmlns:xlink="http://www.w3.org/1999/xlink"
viewBox="0 0 32 32" style="width: 20px; height: 20px; font-size: 20px; color: rgb(255, 255, 255);">
<path d="M27.16 8.08l-1.53 1.29a10 10 0 0 1-.29 13.23l1.47 1.4a12 12 0 0 0 .35-15.88z" fill="currentColor">
</path>
<path d="M21.58 12a6 6 0 0 1-.18 7.94l1.47 1.36a8 8 0 0 0 .23-10.59z" fill="currentColor"></path>
<path
d="M18 30a1 1 0 0 1-.71-.3L9.67 22H3a1 1 0 0 1-1-1V11a1 1 0 0 1 1-1h6.67l7.62-7.7a1 1 0 0 1 1.41 0a1 1 0 0 1 .3.7v26a1 1 0 0 1-1 1zM4 20h6.08a1 1 0 0 1 .71.3L17 26.57V5.43l-6.21 6.27a1 1 0 0 1-.71.3H4z"
fill="currentColor"></path>
</svg>
<span>公告</span>
</span>
<svg class="btn-close" @click="closeBulletin" t="1573745677073" viewBox="0 0 1024 1024" version="1.1"
xmlns="http://www.w3.org/2000/svg" p-id="4448" width="22" height="22">
<path
d="M512 34.133333a486.4 486.4 0 1 0 486.4 486.4A486.4 486.4 0 0 0 512 34.133333z m209.4848 632.8064l-55.6032 55.466667-151.517867-151.125333-151.517866 151.1168-55.6032-55.466667 151.517866-151.108267L307.242667 364.714667l55.6032-55.466667 151.517866 151.125333 151.517867-151.1168 55.6032 55.466667-151.517867 151.099733z m0 0"
p-id="4449"></path>
</svg>
</div>
<div class="bulletin-content">
<h3 class="bulletin-h3">本次更新:</h3>
<p class="bulletin-p">公告样式,参考自 <a class="bulletin-link" href="https://theme-reco.vuejs.press/"
target="_blank">VuePress-Reco</a></p>
<p class="bulletin-p">QQ 频道:******(无效二维码)</p>
<img class="bulletin-img" src="/qrcode.png">
<hr>
<div class="btn-group">
<a class="btn" href="https://vitepress.dev/zh/" target="_blank">官网</a>
</div>
</div>
</div>
</template>
<style>
.bulletin-wrapper {
position: fixed;
top: 5rem;
right: 1rem;
z-index: 30;
box-sizing: border-box;
border-radius: 1.2rem;
overflow-y: auto;
background-color: #1b1446;
box-shadow: 0 10px 30px 0 rgb(0 0 0 / 40%);
}
.bulletin-title {
display: flex;
align-items: center;
justify-content: space-between;
color: rgb(255 255 255);
padding: 1rem;
}
.bulletin-icon {
display: inline-flex;
}
.bulletin-icon.left {
flex-direction: row;
align-items: center
}
.bulletin-icon.left>svg {
margin-right: .375rem
}
.btn-close {
cursor: pointer;
fill: currentColor;
}
.bulletin-content {
padding: 1.5rem 2rem;
background-color: #ffffff;
}
.bulletin-h3 {
margin-top: 0.5rem;
margin-bottom: 0.5rem;
color: #000000;
font-size: 19px;
font-weight: bolder;
}
.bulletin-p {
margin-top: 0.5rem;
margin-bottom: 0.5rem;
color: #000000;
font-size: 16px;
}
.bulletin-link {
color: red;
}
.bulletin-img {
width: 100%
}
hr {
margin-top: 1.5rem;
margin-bottom: 1.5rem;
border-top-width: 1px;
border-style: solid;
border-color: #1b1446;
}
.btn-group {
text-align: center
}
.btn {
display: inline-block;
height: 3.5rem;
width: 3.5rem;
cursor: pointer;
border-radius: 50%;
background-color: #1b1446;
text-align: center;
line-height: 3.5rem;
color: #ffffff;
}
</style>此处的使用的是 layout-top 插槽,配置方式按需选择
<!-- .vitepress/theme/MyLayout.vue -->
<script setup lang="ts">
import DefaultTheme from 'vitepress/theme'
// 组件
import notice from "./notice.vue";
</script>

<template>
  <DefaultTheme.Layout v-bind="$attrs">

    <!-- layout-top插槽 -->
    <template #layout-top>
      <notice />
    </template>

  </DefaultTheme.Layout>
</template>

<style scoped>
</style>// .vitepress/theme/index.ts
import DefaultTheme from 'vitepress/theme'
import { h } from 'vue' // h函数
// 组件
import notice from "./components/notice.vue";
export default {
extends: DefaultTheme,
Layout() {
return h(DefaultTheme.Layout, null, {
// 指定组件使用layout-top插槽
'layout-top': () => h(notice),
})
}
}
